User Guide
DataVault Password Manager for iPhone & iPad
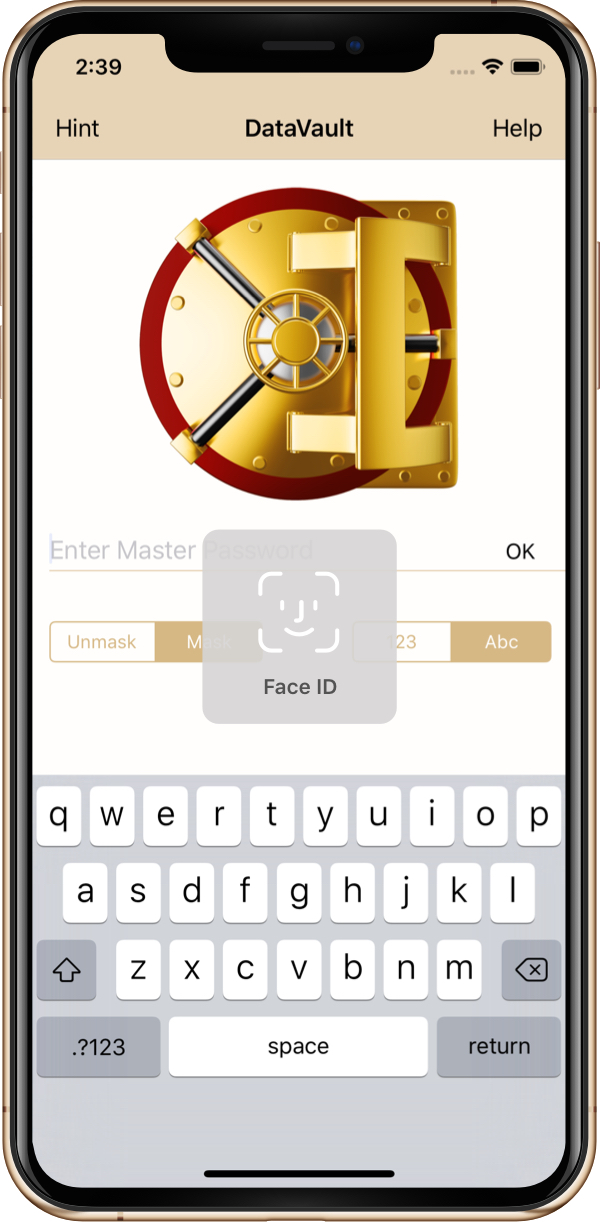
Table of Contents
- Video Tutorials
- Overview
- Quick Start
- Security Settings
- Master Password
- Password Hint
- Lost Password
- Maximum Login Attempts
- Auto-Lock
- Lock on Exit
- Clear Clipboard on Exit
- Face ID & Touch ID
- Backup and Restore
- Using Dropbox
- Using iCloud
- Using Mac Finder
- Using DataVault Desktops
- Using iTunes
- Security Alert
- Searching and Viewing Items
- Tree View
- List View
- Searching for Items
- Extended Search Settings
- Adding, Editing & Deleting Items
- Live Links
- Making Phone Calls
- Sending an Email
- Opening a Website
- Password Autofill
- Logging in to Websites
- Managing Logins
- Adding Logins
- Editing Logins
- Deleting Logins
- Logging into Websites with DataVault Browser
- DataVault Extension for Safari
- Logging into Websites with Safari
- Creating Logins
- Synchronization
- Synchronizing Using Dropbox
- Synchronizing Over Wi-Fi
- iCloud Synchronization
- Alternative Synchronization Methods
- Troubleshooting Synchronization Issues
- Importing from 1Password
- Importing from Keeper
- Importing from Lastpass
- Importing from Dashlane
- Importing from SplashID
- Importing from mSecure
- Importing from YAPS
Overview 
Ascendo DataVault stores confidential information related to credit cards, bank accounts, logins, memberships, etc. in a secure format.
DataVault uses Advanced Encryption Standard (AES), widely regarded as the most powerful technology to protect data on mobile devices.
Each item you store in DataVault comprises an item name, icon, notes and up to ten additional pieces of information. For example, a credit
card item may include fields such as credit card type, number, expiration date, security code, issuing bank, web site address, username,
password as well as notes from a recent discussion with customer service. You can change the labels associated with each field to personalize
the item's format.
Items can be grouped into categories and types so you can organize them in an intuitive way. For example, you might use categories such as
Business and Personal and types such Credit Cards, Bank Accounts and Logins. This would allow you to store a company American Express Card
with other work-related items and a personal Visa Card along with logins for web sites you use at home. DataVault provides a set of default
categories and types but you can add as many as you like and move items from one to another.
Templates are used in DataVault to help you enter items quickly and in a consistent manner. You can select a template when you add an item
and DataVault will automatically fill the field labels and select the item icon. For maximum flexibility, templates are independent of
categories and types. This allows you to use a "Mastercard" template with any category or type. By default, DataVault provides twenty-five
templates but you can add as many as you like.
The DataVault user interface has been optimized for use with mobile devices while remaining consistent with familiar desktop environments.
Items can be displayed in a list or folders similar to desktop file managers. List view includes an alphabetical index to jump
to items starting with a particular letter. Tree view displays items organized in folders by category and type.
For users with large numbers of items, searching on a string of characters may be quicker than navigating through a list or tree.
DataVault offers the ability to customize search to include field labels and notes or take into account case sensitivity.
Numerous security features allow you to personalize how DataVault protects your data. You can enable Auto-Lock to require a log in after an
inactivity delay. If there is a failed log in attempt, you can set up a Security Alert to send an email with the location of your device.
DataVault also provides field masking, a master password hint and a customizable password generator to help you keep your information safe.
DataVault does more than just store information, it allows you to use it in helpful ways. Tapping on a telephone number will initiate an
call. You can tap on an email address to compose a message. If you store a web site address in DataVault, tapping on the URL will launch
Safari and go to the page. DataVault supports the iOS clipboard and multitasking to facilitate logging into web sites.
Mobile devices aren't the only place you need to use confidential information. DataVault for iPhone & iPad can be synchronized with
DataVault for Mac,
DataVault for Windows and
DataVault for Android (sold separately).
DataVault desktops give you the ability to enter information using a full-sized keyboard and keep it in sync with iOS and
Android devices. DataVault provides several synchronization methods so you can chose the one that best fits your needs.
The following sections contain detailed descriptions of how to use these and other features included in Ascendo DataVault for iPhone, iPad
& iTouch.
Quick Start
When you start Ascendo DataVault for the first time, you will be prompted to create a master password. Enter your choice twice and tap on Done in the navigation bar at the top of the screen.
After you enter you master password, DataVault will display sample items in an alphabetical list.
You can tap on the Tree button the toolbar at the bottom of the screen to switch to folder view. Tap on folder icons to open them and display Items such as credit cards information and bank accounts. To collapse or expand all levels in the tree, tap on the icon to the right of
the Tree button in the toolbar.
To add an item, tap on the plus icon "+" in the navigation bar. DataVault will display an item entry form, see iPhone screen shot below. Tapping on the Template button will display a list of pre-defined forms for bank accounts, credit cards, logins, etc.
Selecting a template will automatically display the default icon and field labels. You can tap on any element of an Item to change its contents. When you are finished, tap on Done in the navigation bar to save your modifications or tap on the Back arrow to Cancel.
To edit an item, select it from tree or list view and tap on Edit in the navigation bar. You can tap on any element of an item to change its contents. When editing field contents, a Generate Password button will appear above the keyboards. Tapping the button will display a list of passwords and the options used to generate them. Select a password to close the screen and copy the password to the Item field.
To search for an item, go to tree or list view, tap on the magnifying glass and start typing characters. Only items containing the search string will be displayed. Alternatively, you can use the alphabetical index along the right side of List View to find an item.
Tapping on the Tools & Settings icon on the left of the toolbar will display a menu. You can manage backups, synchronization, security settings and a host of other powerful features.
Security Settings
Master Password
When you start DataVault for the first time, you will be prompted to select a master password. The password can contain letters, numbers and punctuation marks.
You are required to enter the master password twice to insure that you don't inadvertently save a mistaken master password. Tap on the Done button in the navigation bar to save.
On subsequent startups, you will be prompted to log in into DataVault. Tap on Unmask if you want to see your password in clear text. Tap on 123 to display a numeric keyboard or ABC to display the alphanumeric keyboard.
DataVault supports the use of Face ID or Touch ID to log in. See section on Security Settings for configuration instructions.
If you plan to synchronize, you must choose the same DataVault password on all devices.
Password Hint
You can set up a Password Hint question and answer to retrieve your master password in case you forget it.
To create or edit a Password Hint, click on the Tools & Settings icon in the tool bar and select Change Password Hint.
Examples of hint questions could be; "What is your mother's maiden name?", "Who was your best friend in high school?" or "What city did your parents get married in?"
Lost Password
Your master password is used to encrypt and decrypt information stored in DataVault. Nobody can access your data without your master password, not even Ascendo.
If you forget your master password, there are several things you can try to retrieve it.
Tap on the Unmask button below the Enter Master Password field to show the characters you are typing in clear text. Master passwords are case sensitive so make sure to use the Shift key when necessary. Double-check characters that look similar such as the number one and the letter "l" or the number zero and the letter "O".
Click on the Hint button in the navigation bar and answer the Hint question. DataVault will respond by providing you your master password.
If these methods do not work, you can reset the database by entering the wrong password repeatedly until you have exceeding the maximum number of login attempts. This will erase all your data so only do it as a last resort. When you restart DataVault you will be asked to select a new master password.
Maximum Login Attempts

To protect your data if your device falls into the wrong hands, DataVault provides a setting for Maximum Login Attempts. After exceeding the maximum login attempts, then information stored in DataVault will be erased.
To set Maximum Login Attempts, tap on the Tools & Settings icon on the home screen and select Security Settings.
Auto-Lock
Auto-Lock will log you out of DataVault after several minutes of inactivity. This is helpful in case you leave you phone unattended and forget to quit DataVault.
Auto-Lock is in effect when you switch applications. For example, if you tap on a URL stored in DataVault to open a web site in Safari, you can switch back to DataVault before the delay expires and you won't have to log in.
This can be useful to cut and paste passwords when using DataVault to
log in to web sites.
Lock on Exit
If you enable Lock on Exit, DataVault will require login every time you switch to another application, whether or not the Auto-Lock inactivity duration has expired.
Clear Clipboard on Exit
If you turn on Clear Clipboard on Exit, anything you Copy will be cleared from memory when you quit DataVault.
Face ID & Touch ID
Once you create a master password, you can configure DataVault to log in with Face ID or Touch ID on supported devices. Configuration options will only appear if you have scanned your face or thumbprint in iOS Settings.
To enable Face ID or Touch ID for DataVault, tap on the Tools & Settings icon on the home screen > Security Settings then turn on Face ID or Touch ID.
Require Password determines how often DataVault will prompt you for your master password when Face ID or Touch ID is enabled. It is set to Never by default.
There are several reasons why you might want DataVault to ask you for passwords at set intervals.
First, requiring your master password at specific intervals provides two-factor authentification.
Second, using Touch ID after quitting DataVault makes it necessary to store a copy of your master password to the iOS Keychain. While the iOS Keychain offers a high level of protection, storing the master password anywhere on the device is less secure than not storing it at all. We believe you deserve the choice so DataVault gives you options.
If you set Require Password to Once per Session you must enter your master password when you start DataVault for the first time. As long as DataVault is visible in the task switcher, Touch ID will be used for subsequent logins. Your password won't be stored anywhere on the device. If you set Require Password to Daily, Weekly or Monthly,
your master password will be securely stored in the iOS Keychain.
Backup and Restore
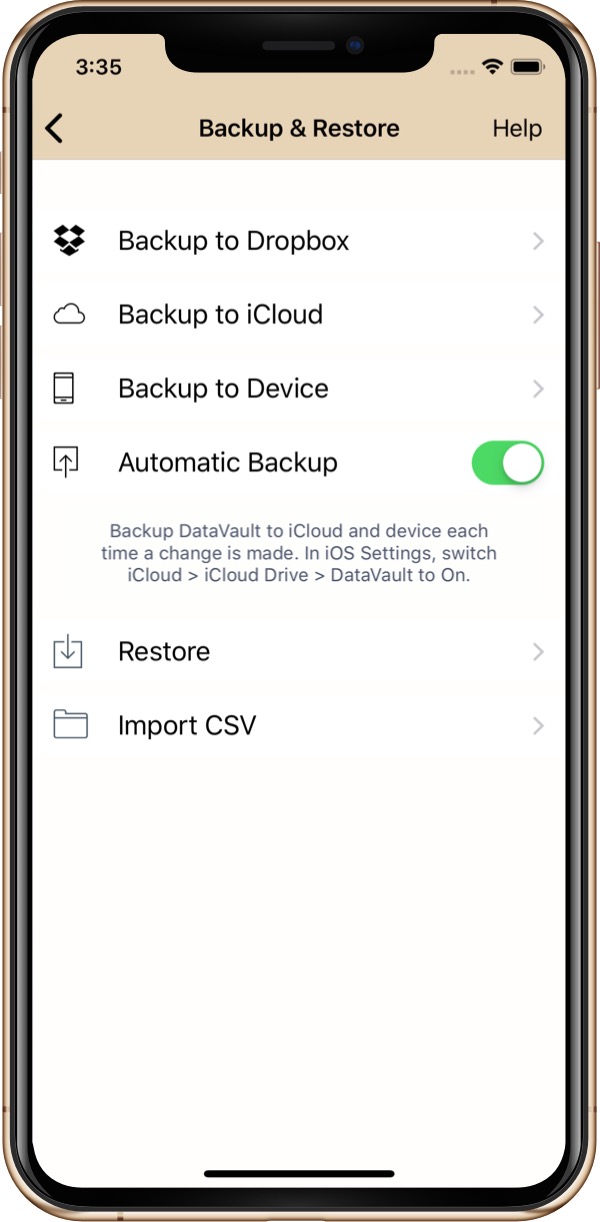
DataVault implements a Distributed Security Model to insure the highest level of security. Unlike many other password managers, DataVault does not store users' data on centralized servers. Your data stays on your device and personal storage spaces, so it is important to understand the backup amd restore options provided by DataVault.
DataVault for iOS automatically starts backing up your data to iCloud and your device as soon as you install it. To verify that iCloud automatic backup is active, go to iOS Settings > iCloud > iCloud Drive and make sure DataVault is switched to On.
Dropbox
DataVault can backup and restore information using a free Dropbox account.
To backup to Dropbox, tap on the Tools & Settings icon, then tap on Backup & Restore > Backup to Dropbox. If you have not already logged in, you will be asked to enter your Dropbox username and password. After logging in to Dropbox, DataVault will propose a default backup filename including the date and the device name.
After accepting or editing the filename, tap on the Backup button. After a few seconds, a confirmation should appear indicating that the backup was successful.
To restore from Dropbox, tap on the Tools & Settings icon, then tap on Backup & Restore > Restore. DataVault will display all available
backups by location (Device, iCloud, Dropbox). Tap on a file in the Dropbox section to restore its contents. If the password used to make
the backup is different than the master password, you will prompted to enter the password used to make the backup.
To delete a backup, swipe your finger from right to left across the filename and confirm deletion.
iCloud
DataVault can create an automatic daily backup and store it on your iCloud disk space. To use this feature you must have an iCloud account.
Once your iCloud account is set up, go to iOS Settings then select iCloud and set Documents & Data to ON. Then start DataVault on your
iOS device, tap on the tools icon, select Backup & Restore and set Backup Using iCloud to on. If you edit DataVault information a backup will be automatically stored on iCloud. In accordance with Apple guidelines, only one backup per day will be stored in iCloud with the most recent edits.
Turning on Automatic Backup will make a backup to iCloud and to your device each time you modify an item. DataVault will save the last seven automatic backups and delete the older ones. The filenames of automatic backups will include AutoBackup.
To restore from an iCloud backup, start DataVault and select Backup & Restore > Restore DataVault will display all available backups by location (Device, iCloud, Dropbox). Tap on a file in the Dropbox section to restore its contents. If the password used to make the backup is different than the master password, you will prompted to enter the password used to make the backup.
To delete a backup, swipe your finger from right to left across the filename and confirm deletion.
More information can be found on the iCloud Backup and Restore page in the Apple Knowledge Base.
If you are having problems using iCloud Backup, troubleshooting information can be found on the DataVault for iOS
Frequently Asked Questions page.
Using Mac Finder
Mac OS Catalina and above allows you to access files on your iOS device. You can use Mac Finder to move files from your iOS device to Mac or from Mac to iOS. Finder provides an additional way to backup and restore DataVault but be careful not to overwrite files by accident.
To use this method, follow the steps below.
- Open a Finder window.
- Connect your iPhone, iPad, or iPod touch to your Mac.
- Select your device in the Finder.
- Click the Files tab to see a list of apps that can share files.
- Click the triangle next to an app to see the files that you can share.
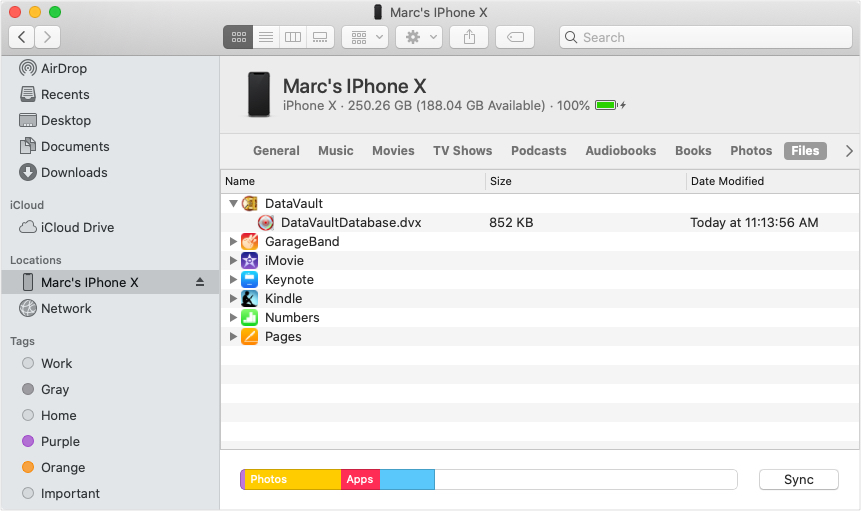
More information can be found in Apple documentation on how to Use the Finder to share files and how to Use iTunes to share files.
Using DataVault Desktops
You can use the .dvx file straight from iTunes to import into DataVault on your desktop. You can also sync the .dvx backups like any other document so that you can use them to restore your data to a replacement iPhone, or after you’ve done a restore.
Drag the backup you want to use to your desktop, and then point DataVault there after initiating a restore from File Restore.
Using iTunes
You can use iTunes to backup and restore applications in addition to other media. However, iTunes backs up your entire device and certain restrictions apply to data
stored in 3rd party applications. Detailed instructions are available in the Apple Knowledge Base article
Backing up, updating, and restoring iOS software.
Please Note: As recommended by Apple, DataVault for iOS stores information in the Apple KeyChain. For security purposes, iTunes will not restore
KeyChain information to a new device unless you selected to encrypt the backup when you created it with iTunes, see
Apple Knowledge Base article About iOS backups for more information.
To encrypt iTunes backups, check off Encrypt iPhone/iPad Backup in Device > Summary. Be sure to note the password used to make the iTunes backup as it
will be required to restore from the backup, see iTunes support for more information.
Security Alert
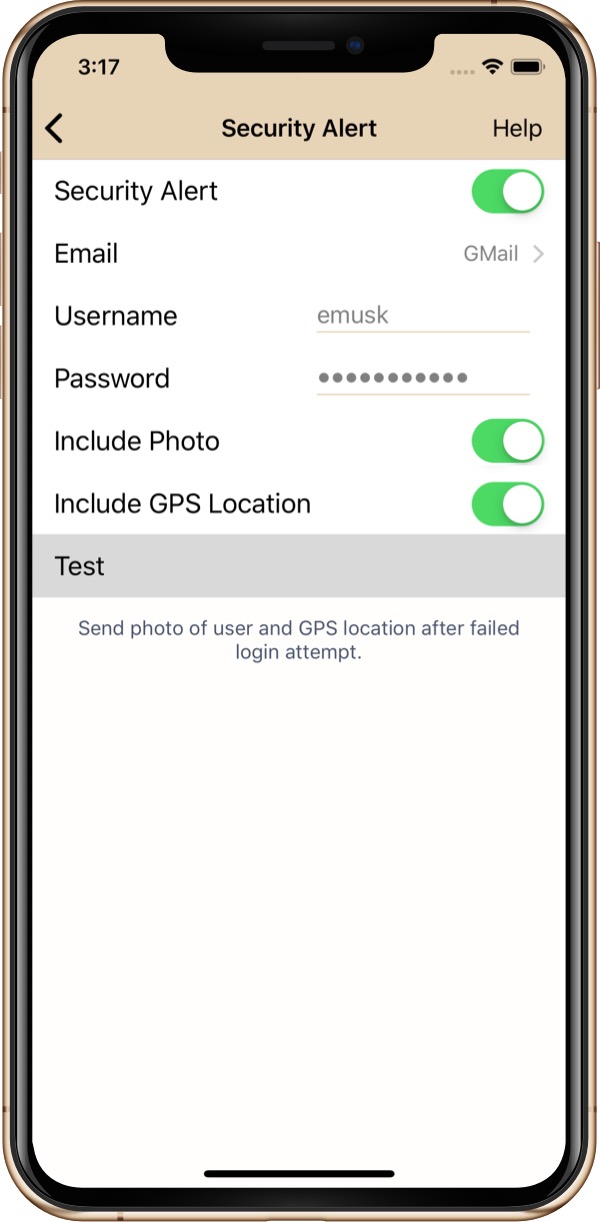 After each failed login attempt, DataVault can send you an email with a picture of the user and their location.
You can enable this feature in Settings > Security Alert.
After switching on Security Alert, select an email provider. At the current time Gmail, iCloud and Hotmail are supported.
Then enter your username and password. Please note that you should only enter the characters in your username that appear before the @ symbol.
Choose whether to include a photo and location then tap Test to send a sample email.
If you are having problems with a Gmail account, create an app password for DataVault as explained in Google Support.
If you are having problems with an iCloud account, create an app password for DataVault as explained in Apple Support.
Searching and Viewing Items
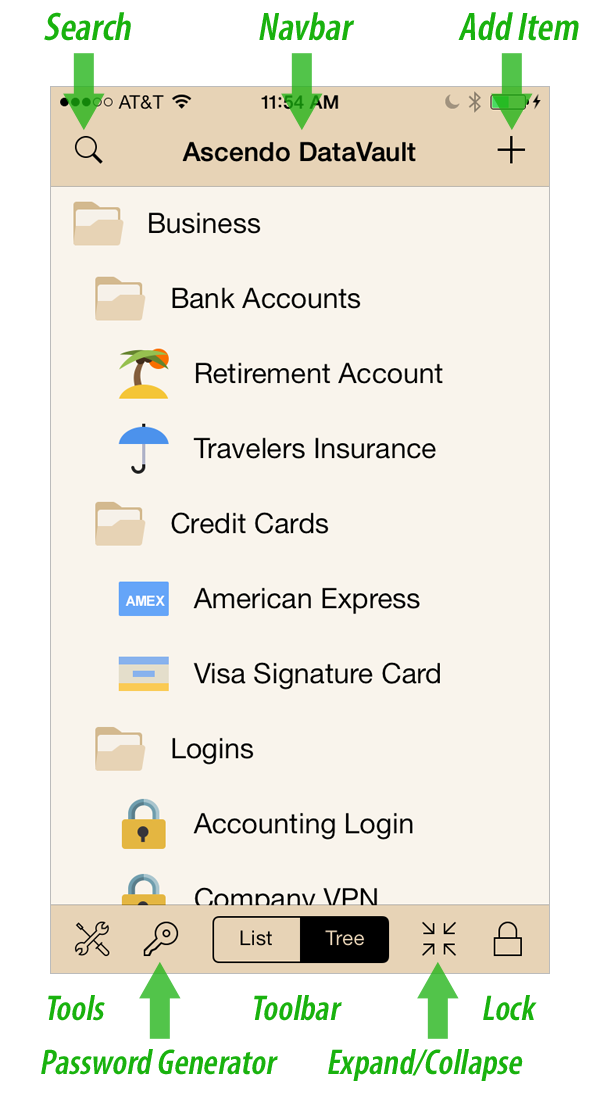
After you enter your master password, DataVault will display items in a List or Folder View. You can switch between the two by tapping on the List and Tree buttons in the middle of the toolbar.
DataVault will remember the View displayed when you quit DataVault and return to it the next time you start DataVault.
List View
List view displays items in an alphabetical list. An index appears along the right side of the screen. You can tap anywhere in the index to move to the first item beginning with the letter. Alternatively, you can hold your finger down on the index and slide it up or down to move to the first entry beginning with the letter beneath your finger. To move to the top of the list, tap on the arrow button in the Tool Bar. You can scroll the list using finger swipe. To view an item, tap on the item name.
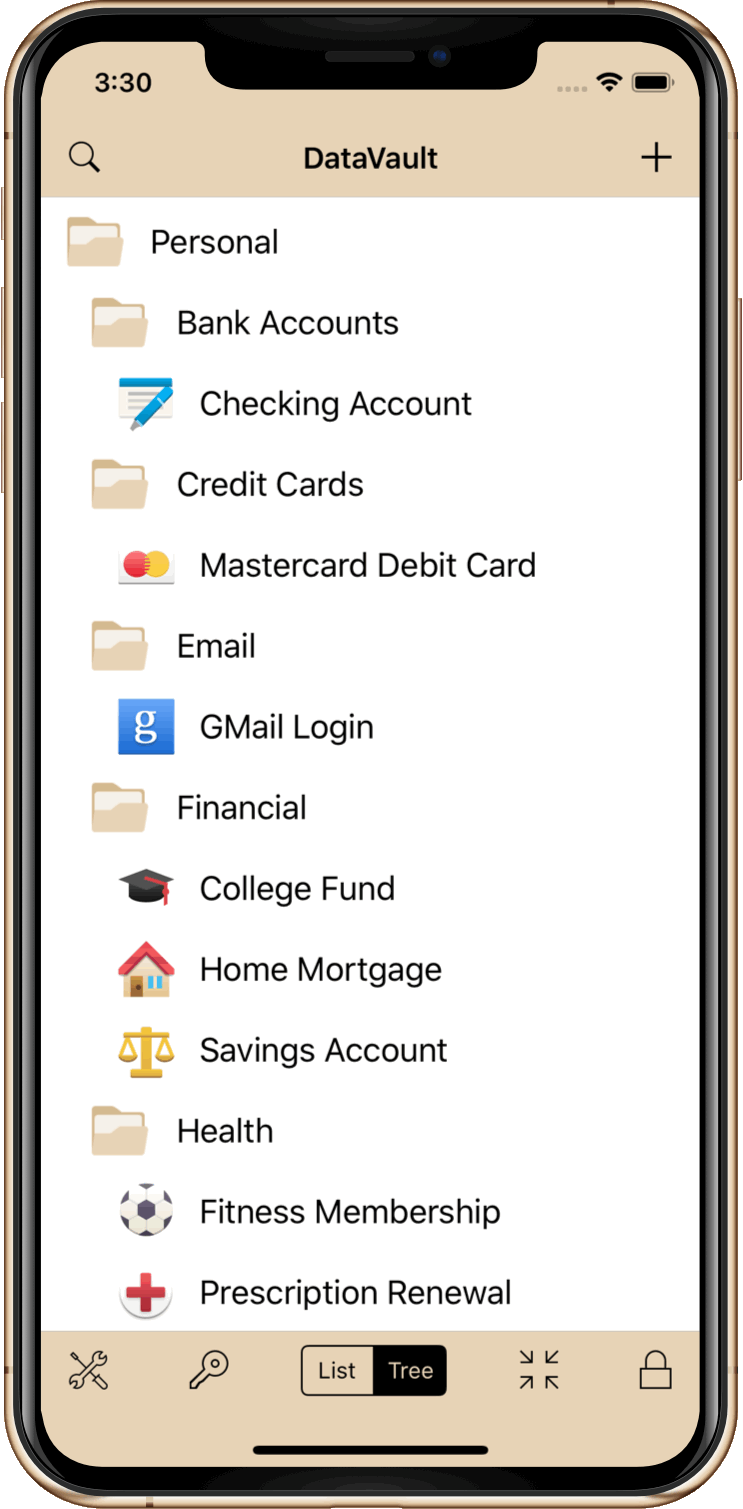
Folder View
Folder view displays items organized by categories such as Business, Personal, etc. and types such as Credit Cards, Logins, etc. Categories are the first level of the tree, farthest to the left, types are the second level of the tree and items are the third level in the tree, farthest to the right. You can tap a folder icon to open and close a category or type. To expand or collapse all levels in the tree, tap the "+" or "-" button on the Tool Bar. You can scroll the list using finger swipe. To view an item, tap on the item name.
Searching for Items
To search for items, go to Tree or List view and tap on the magnifying glass in the Navigation Bar. Start typing characters in the keyboard and the list will be reduced to items starting with the string of characters you entered. To display the item, tap on the item name. To clear the search bar, tap on the "x" icon. To return to Tree or List view without searching, tap on Cancel.
Extended Search Settings
By default, DataVault will search in the item name only. You can adjust search settings to look in other fields and to apply case-sensitivity. To do this, tap on the tools icon at the top right and then choose Extended Search. Four options are available: Search in Labels, Search in Values, Search in Memo, and Case Sensitive. Simply enable (ON) the option where you want to be able to look for information.
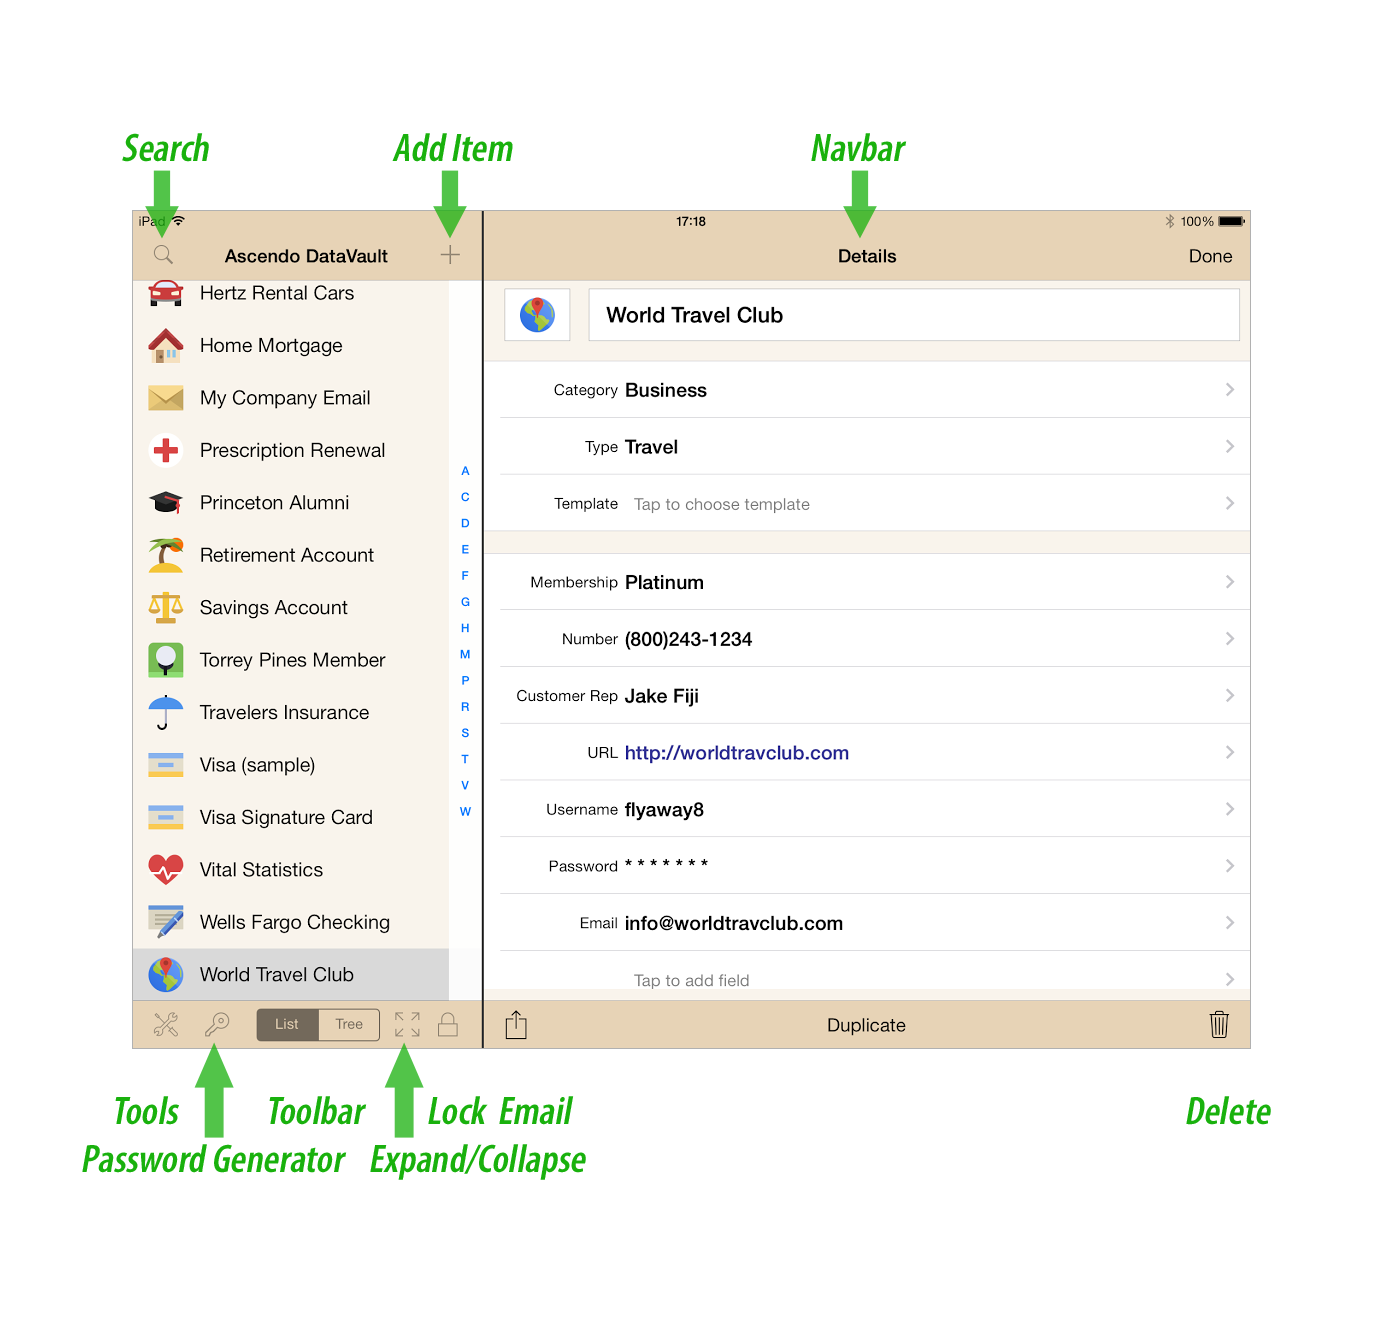
Adding, Editing & Deleting Items
To add an item, go to list or folder view and tap the "+" button on the tool bar. DataVault will ask you to Add an Item or Add a Login. Logins are pre-configured Items that can be used to automatically login to websites.
If you select Add an Item, DataVault will ask you to choose a Template such as a Credit Card, Driver License or Financial account. If you select a Template, DataVault will automatically set the icon and fiels labels. You can also select No Template at the top of the list to choose your own icon and field labels. You can change the Template at a later time by tapping on the center icon in the toolbar.
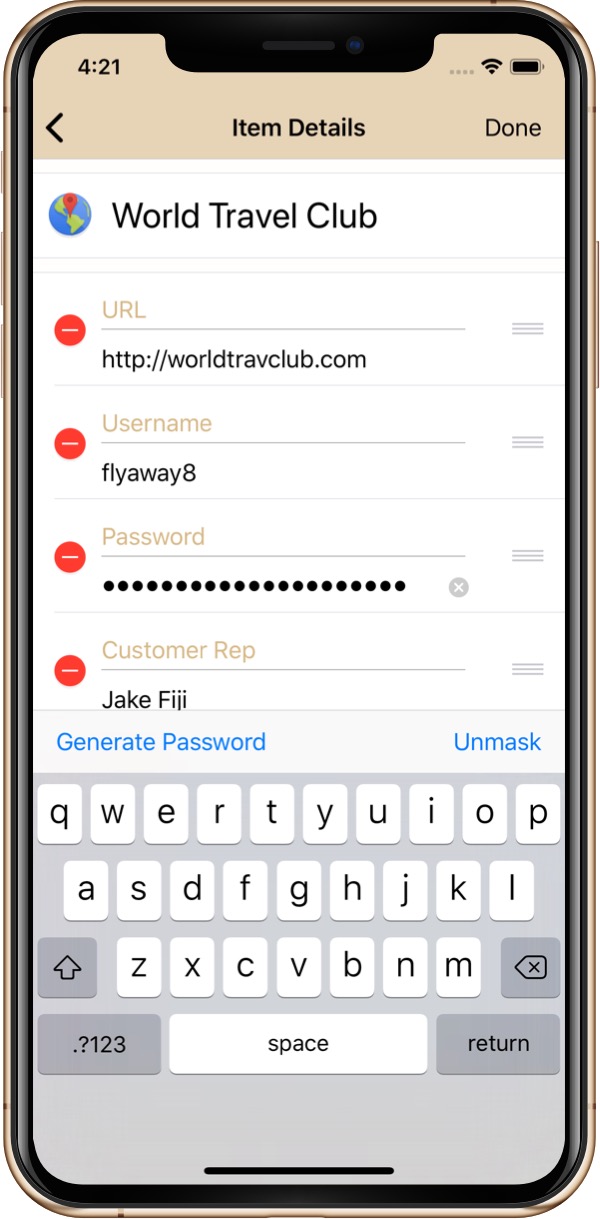
After selecting a Template or No Template, tap on any field label, field value or the item icon to change it. When you have finished, tap Done in the navbar.
If you are enterring a password, DataVault can suggest a value by tapping Generate Password above the keyboard. If you want to mask a field by default, tap Mask above the keyboard.
If you have several items that are similar, you can save time by making a copy of an existing item and changing some of the fields. To do this, go to List or Folder view, select an item then tap on the Duplicate button in center of the toolbar.
There are two ways to delete items. The first way is to go to the tree or list view and swipe your finger from left to right on the item name. A red Delete button should appear to the right of the item name. Tap the button to delete the item. The second way is to select an item from the tree or list view and tap on the Delete button in the tool bar.
Live Links
Live links are fields stored in DataVault that perform special actions when you tap on them. Live links are displayed in blue and can only be activated from the item details screen.
Making Phone Calls
One type of live link is a telephone number. If you enter a field containing seven or more digits, DataVault will assume it is a telephone number and store it as a live link. If you tap on the field, DataVault will prompt you for confirmation, then launch the iOS Phone application and initiate a call to then number stored in DataVault.
Sending an Email
Another type of live link is email addresses. If you enter a field containing "@" followed by a period, DataVault will assume it is an email address and store it as a live link. If you tap on the field, DataVault will prompt you for confirmation, then launch the iOS Mail application and display the compose message screen and automatically fill the To field with the email address stored in DataVault.
Opening a Website
The last type of live link is an internet site address or URL. If you enter a field beginning with "https://", DataVault will assume it is a URL and store it as a live link. If you tap on the field, DataVault prompt you for confirmation, then launch Safari and go to the URL stored in DataVault.
Password Autofill
You can automatically login to apps or websites using Password Autofill with DataVault version 7.2 and above on iOS 12.
To set up Password Autofill, follow the steps below.
- Open iOS Settings.
- Tap Passwords & Accounts > AutoFill Passwords.
- Turn on Autofill Passwords.
- Select DataVault.
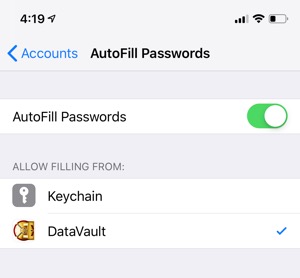
To stop iCloud Keychain from asking to save passwords, deselect it from the list.
To use Password Autofill with an app or a website, go to the login screen and tap on the username or password field. If you have a login stored in DataVault, the username will appear above the keyboard. Tap it to automatically fill the username and password.
If you have more than one login for an app or website, tap the key icon above the keyboard to choose a different one.
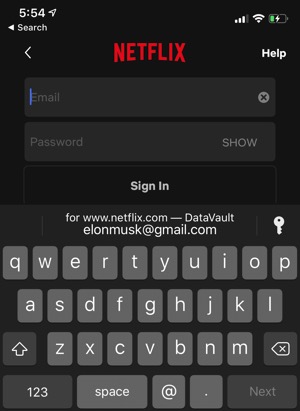
To save a website login, tap Passwords above the keyboard, then tap New Login. Enter your username, password and tap Save.
Logging in to Websites
If you are running iOS 11 or below, DataVault offers alternative methods to log in to Websites.
Tapping on a web site address (URL) stored in DataVault will launch Safari and go to the page. DataVault field contents can be copied and pasted into web forms. In addition, DataVault supports iOS multitasking so you can switch between Safari and DataVault to speed the process.
The following example illustrates how to login to a Gmail account. The DataVault security settings for this example are Security Time Out enabled, Time Out Action set to Lock and Auto-Lock set to No.
- Tap on the clipboard icon to the right of Username, see left screen shot above. A prompt will appear asking if you want to copy the value to the clipboard. Answer Yes.
- Tap on the URL to launch Safari and go to the Gmail login page.
- Tap on the username field in the Gmail login page to show the keyboard then tap on the username field again to display the "Paste" bubble, see center screen shot above. Tap on Paste to copy the username to the web form.
- Double-press on the iOS home button to display active applications then and tap on the DataVault icon to switch back to DataVault, see right screen shot above.
- Tap on the clipboard icon next to the password field and answer Yes when prompted.
- Double-press on the iOS home button and switch back to Safari.
- Tap on the password field in the Gmail login screen and paste the password into the form.
- Tap on the "Sign In" button to login to Gmail.
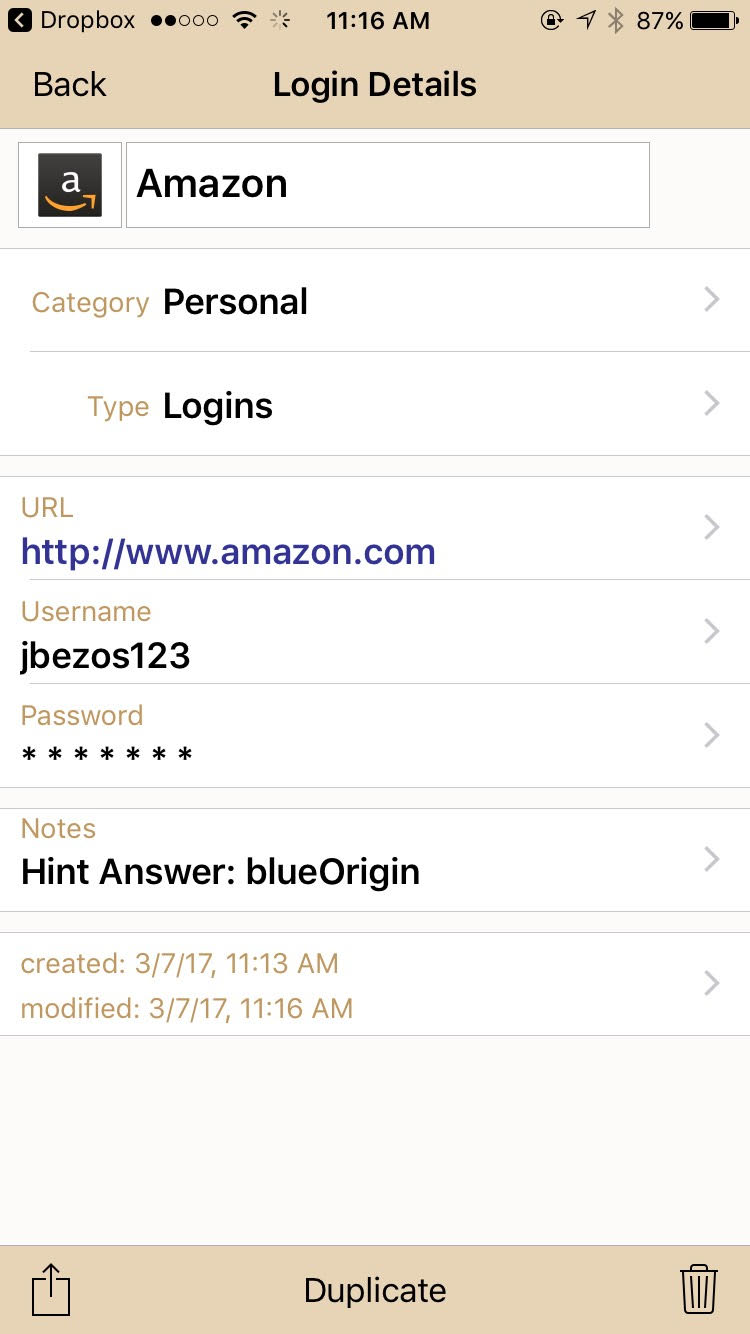
Managing Logins
DataVault Logins allow you to open a website and automatically fill in the username and password. Logins appear in List View and Folder View along side of Items but they have different characteristics.
The first three fields of a Login are "URL", "Username" and "Password". Unlike Templates, you cannot change these field labels. The URL contains a website address for a login screen. The Username and Password are used to autofill the login screen.
If you create an Item and enter the first field label as "URL" then DataVault will consider it to be a Login. If this is not your intention then consider naming the first field label "Website" or similar. Once an Item has been turned into a Login, you cannot revert back to an Item and you cannot change the labels of the first three fields.
Adding Logins
You can add a login from the DataVault home screen by tapping on the Add icon in the upper right, then select Add Login.
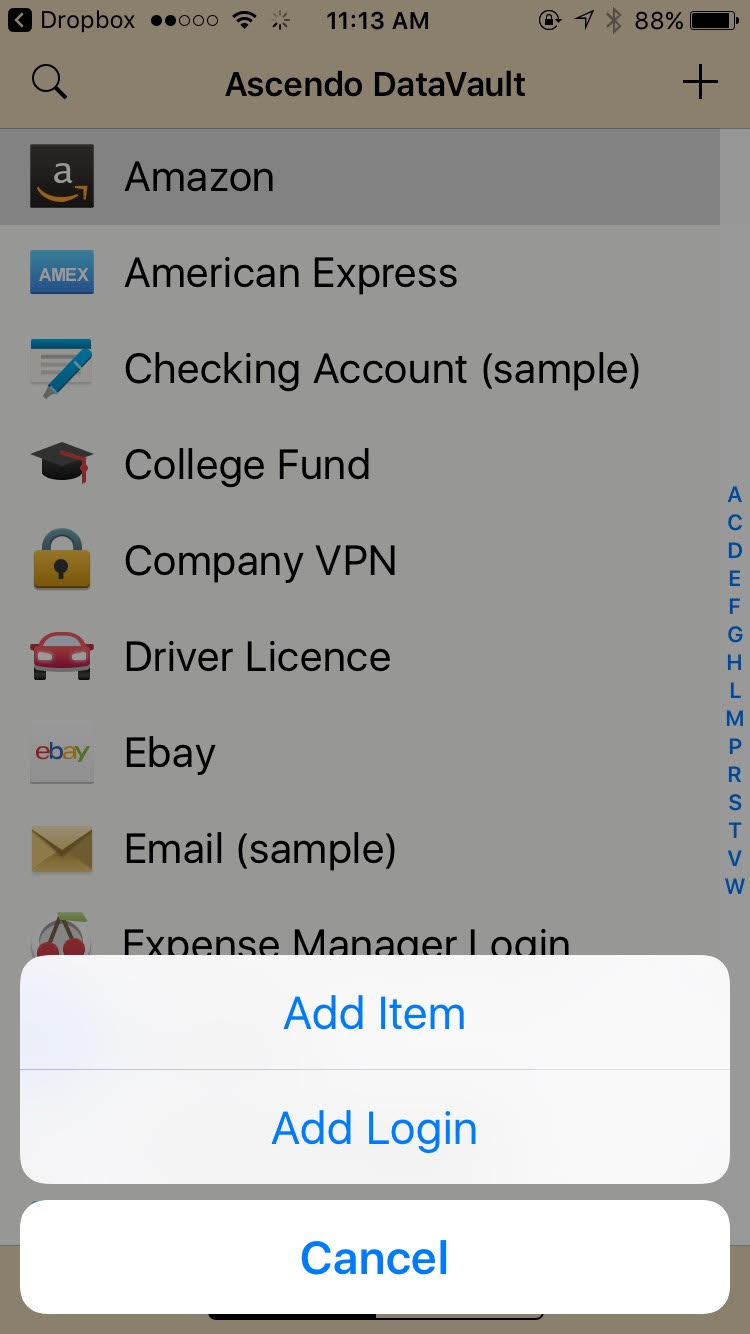
DataVault will display numerous logins for popular web sites like Amazon, LinkedIn, Facebook and many more. If a website you would like to add is not in the list, you can create a login using the DataVault Extension for Safari.
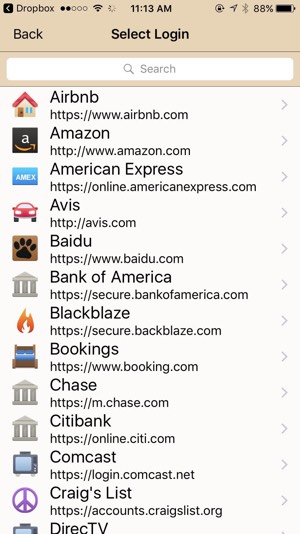
Once you have selected a login, enter the username and password and tap Done.
Editing Logins
To edit a login, tap on its name in List or Folder view and tap on Edit to the right of the navigation bar. Then, tap on the login icon
or any of the fields to change them.
URLs must start with "https://" or "https://" to open websites. Login URLs have been pre-filled with the login pages at the time of
the most recent release of DataVault. You should not change the URL of a website unless you are sure the login page has changed.
Logins must maintain a specific format so the second and third fields are labeled "Username" and
"Password" and cannot be changed. A Notes field is provided to store information such as hint answers and questions.
Deleting Logins
You can delete a login in two ways. Go to the List or Folder view, swipe left on the Login name then tap Delete. Alternatively, go to
item details screen and tap no the trash can icon.
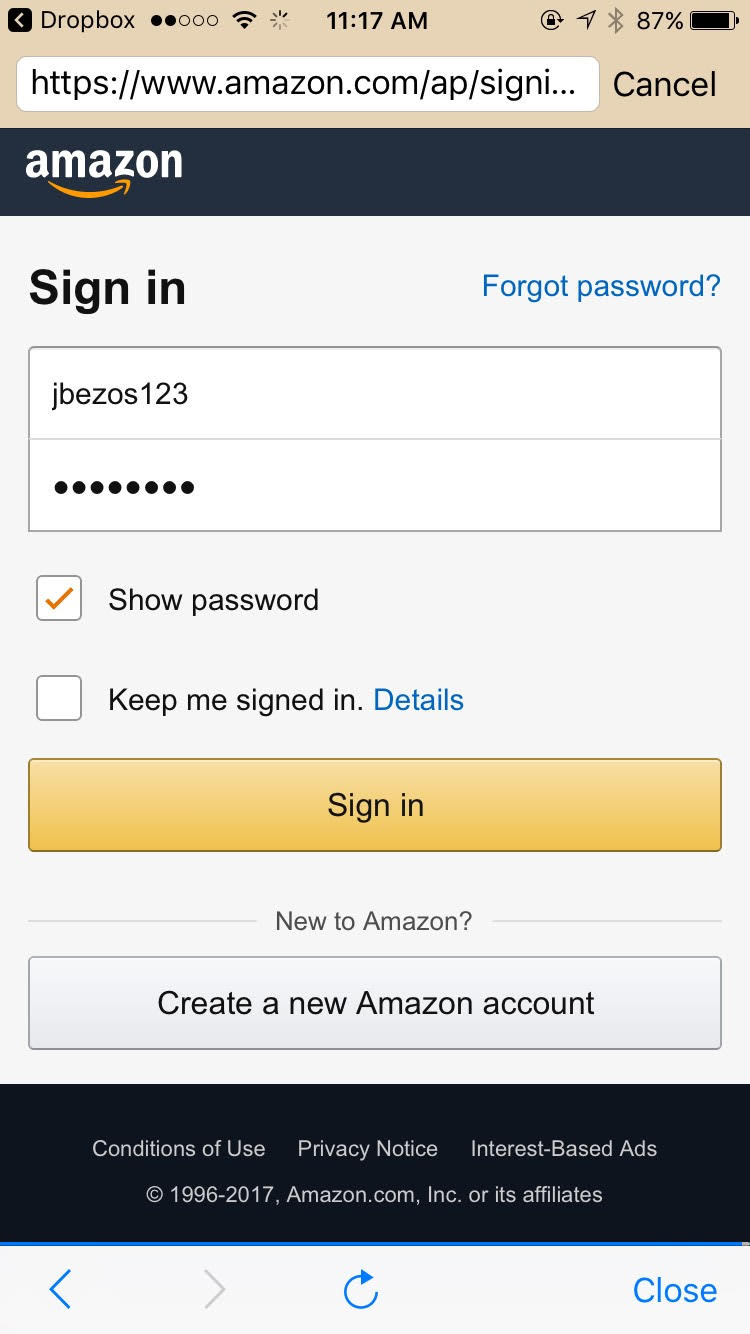
Logging into Websites with DataVault Browser
To use a Login, select it from List or Folder View, then tap on the URL. You will be prompted to Open with DataVault or
Open with Safari. Tap on Open with DataVault. DataVault will automatically enter the username and password into
the web form. On some sites such as Amazon, you may need to navigate to a "Sign In" or "Login" screen to autofill the
username and password.
If a website login screen changed since the current version of DataVault was released, automatic Login may not work. In this case you should copy the password to the clipboard, then Open with Safari, enter the username and use iOS Paste to enter the password.
DataVault Extension for Safari
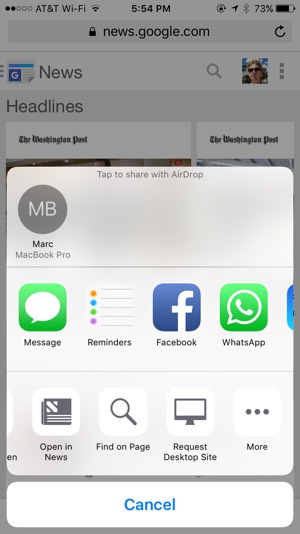
The DataVault Extension for Safari allows you to login into a websites directly from Safari and create new Logins from Safari.
To setup the DataVault Extension, open Safari and tap on the Share button located in the middle of the bottom row of buttons. Swipe the row
of black and white icons at the bottom of the pop-up window all the way to the right then tap on More. Switch on the DataVault
Extension. When you go back to the list of Safari Extensions, you should see a black and white icon for DataVault.
Logging into Websites with Safari
You can log into a website using Safari in several ways.
The first is to use iOS task switching to copy and paste your username and password into a web form.
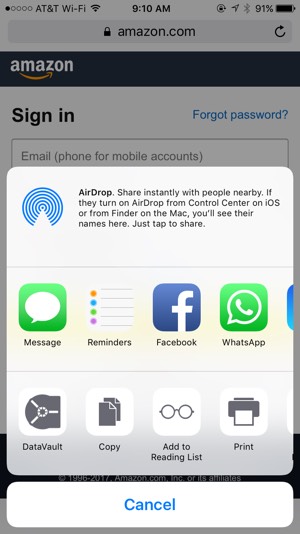
The second is to use the DataVault Extension for Safari by following the steps below.
- Add a DataVault Login including username and password.
- Tap on the URL and select Open with Safari.
- Tap on the Safari Share icon in the middle of the bottom row of icons.
- Select the DataVault Extension & login using Touch ID.
- Tap on the Login for the website.
Logging in with the DataVault Browser or Safari are equally secure. The DataVault Browser simply saves a few keystrokes from the process.
Creating a Login
If your website is not available in the list of pre-defined Logins, you can create a new one following the steps below.
- Go to the login page of a website.
- Enter your username and password and tap Done to hide the keyboard.
- Tap on the Safari Share icon in the middle of the bottom row of icons.
- Select the DataVault Extension & login using Touch ID.
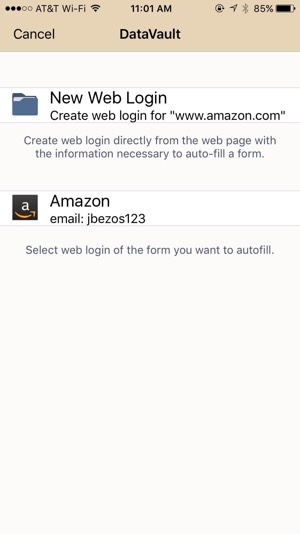
- Tap New Web Login.
- Verify that the username and password are correct, then tap Done.
Your login will now appear in List or Folder View. To use it, tap on the Login and select Open with DataVault.
Synchronization
DataVault for iPhone, iPad and iPod Touch can synchronize items, categories and types with DataVault for Android, Mac, Windows and other iOS devices.
DataVault implements 2-way synchronization so that all additions, edits and deletions are taken into account regardless of the device on which they
are initiated. If the same piece of information is modified on two devices then DataVault will choose the one with the most recent timestamp.
To synchronize DataVault for iPhone, iPad or iPod Touch with other devices, the passwords on each device must be the same. You can verify the password on a device by using the unmask feature before you login. To modify a password select Change Password from the Options menu.
The use of 3rd party software such as VPNs may interfere with synchronization. If you have have problems syncing with the methods described below, check our FAQ for troubleshooting tips.
Synchronizing Using Dropbox
DataVault for iOS (v4.3.54+) can synchronize with DataVault for Mac (v4.5.4+) or DataVault for Windows (v4.8.21+) using Dropbox, a popular data storage service. To synchronize using Dropbox you must create a free Dropbox account, install Dropbox on all devices running DataVault and follow the steps below.
- In DataVault for Mac, select File > Synchronization Settings from the menu bar. Select Dropbox and enter your username and password. Then select File > Synchronize from the menu bar.
- In DataVault for Windows, select Tools > Synchronization Settings from the menu bar. Select Dropbox and click on the Ok button. DataVault will open the default browser and go to the Dropbox login screen. Login to Dropbox then select the DataVault confirmation window in the task bar and click on OK. Then select File > Synchronize from the DataVault for Windows menu bar.
- Start DataVault for iOS. Tap on Tools button in the navigation bar. Select Synchronize > Dropbox and login.
- Tap on Synchronize Now.
If you purchased DataVault Premium, an option should appear in Settings > Synchronization > Dropbox
called "Dropbox auto-sync". If you tap the switch to enable auto-sync, DataVault will keep an encrypted copy of the data file in your
Dropbox cloud storage. When auto-sync is enabled on a device, DataVault will automatically check for updates on Dropbox and prompt you
to sync if necessary. If you make updates on the device, DataVault will update the data file on Dropbox so other devices can sync with them.
Synchronizing Over Wi-Fi
To initiate synchronization, start Ascendo DataVault Desktop,
go to the file menu and select Wireless Synchronization.
Now start Ascendo DataVault on your iPhone, iPad or iPod Touch and tap on the tools icon in the
navigation bar to display the Options menu. Tap on Synchronize > Wi-Fi Network to display a list of
detected devices. Choose the device on which DataVault desktop is running. Verify the IP address and port then tap
on Synchronize Now. A progress circle will appear until synchronization is complete.
iCloud Synchronization
DataVault can automatically update edits made on an iPhone, iPad or iPod Touch to other iOS5 devices using iCloud.
To use DataVault iCloud Sync, follow the steps below.
- If you haven't done so already, create an iCloud account.
- Power off and on your iOS device.
- Login to iCloud on your iOS device by tapping on Settings > iCloud > Account.
- Verify that Settings > iCloud > Documents & Data has been switched ON.
- Start DataVault on your iOS device and verify that the master password is the same on all devices.
- Tap on the tools icon in navigation bar and switch Synchronize > iCloud > iCloud Sync to ON.
- Repeat these steps for all iOS devices.
If you have configured all devices correctly and DataVault edits have not been propagated after several minutes, try quitting and restarting DataVault on each device. If that doesn't resolve the issue,
power off and on each device and try again.
DataVault iCloud Sync will not synchronize with DataVault for Windows at the current time. For instructions on syncing with DataVault desktops, skip to the sections below.
PLEASE NOTE: Apple has only recently provided developers with access to iCloud synchronization services for application data. In our tests, updates were propogated in as few as a
few seconds but often took considerably longer. As has been reported in Apple Support Communities, reliability
issues with iCloud data synchronization are being addressed in new iOS updates.
If you are having problems using iCloud Sync, troubleshooting information can be found on the DataVault for iOS
Frequently Asked Questions page.
If you are unable to resolve iCloud sync issues using these support resources, we recommend using Dropbox synchronization while waiting for iOS
updates that resolve these issues.
Alternative Synchronization Methods
If you don't have access to a Wi-Fi router but your desktop has a wireless adapter, then you can setup an ad-hoc network to synchronize DataVault on your handheld and desktop.
- Setting up an ad-hoc network on a Mac, click here.
- Setting up an ad-hoc network on Windows, click here.
Troubleshooting Synchronization Issues
Troubleshooting tips can be found in the frequently asked questions or
FAQ page.
If you are still having problems synching please send an email to wallet_support@ascendo.co