User Guide
DataVault Password Manager for Windows
Table of Contents

Overview
Ascendo DataVault is a Secure Password Manager that allows you to store personal information like usernames, passwords and PINs using the most powerful encryption method available.
You can store up to 10 pieces of information and additional Notes with each Item. For example, a health insurance item may include information like your Subscriber Number, Group Number, Plan, Primary Physician, etc. You can change the label associated with each piece of information and the field contents.
Items can be organized into Categories and Types. Examples of Categories could be "Personal" and "Professional". Examples of Types are "Credit Cards", "Logins", "Insurance" and "Driver License". Classifying each item provides an intuitive way to display your Items in a Tree View and a quick way to find them. For example, you might have an American Express card that you use for work and a Visa card that you use for personal use.
DataVault provides a set of Templates including a default field labels and icon. Templates can be used to speed data entry for similar items. For example, you may have several logins that each have a username and password. Selecting a Template allows you to avoid typing the same information over and over again.
You can display Items in List View or Tree View. List View displays each Item in a separate row with two or more columns for the fields of the item. The Tree View displays Items as levels in a tree where the first level is Categories, the second level is Types and the third level is Items. The tree levels can be expanded or collapsed to show more or less information on one screen.
You can Search for Items by typing characters at the top of the List View and Tree View screens. DataVault provides an Extended Search feature that allows you to search on all fields, not just the Item name.
DataVault includes numerous features to manage the security of your information such AES encryption for backup and restore, master password hint, Security Time-Out, Deleted Item Log, screen keyboard and a customizable Password Generator.
DataVault for Windows allows you to import data in standard text formats and from third party password managers. You can export items into standard text formats or in DataVault Exchange files for sharing with other DataVault users. In addition, you can send and receive encrypted emails with DataVault.
DataVault Desktop provides advanced browser integration with Internet Explorer, Chrome and Firefox. You can automatically fill in web forms with usernames, passwords and other fields to save time when logging in to a site. In addition, you can save web site names, addresses and fields directly to DataVault Desktop.
Ascendo DataVault protects your data, simplifies managing confidential information and saves you time. DataVault gives you instant access to private information when ever you need it.
Installation
To download DataVault for Windows, please see the latest instructions on our
FAQ page.
Once you have download DataVault for Windows, double click on the file starting with DataVaultWindows to start the installation process. The first
window you will see is the Setup Wizard. Close all applications including internet browsers, to insure proper installation.
The next window will contain checkboxes to select browser extension used for auto-filling web forms. Click Next to accept the default settings
or check the boxes to remove support for specific browsers.
After completing the installation options you will be prompted to enter your registration key. If you have purchased DataVault for Windows you should
have received a registration key by email. Enter the registration key and click on Submit. If you did not receive a registration key,
please see our FAQ page for additional information.
If you did not purchase DataVault, you can use it for free during the trail period by clicking on Register Later.
Master Password
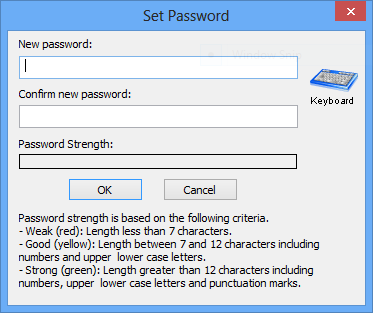
When you start DataVault for the first time, you will be prompted to create a master password. Enter your choice, then confirm it and tap on the Ok button at the bottom of the window. If you
plan to synchronize DataVault with other platforms, you must select the same password for both.
As you type your password a strength meter will appear to tell you if your password is weak, good or strong.
After you select a master password, the DataVault home screen will be displayed. Sample Categories, Types and items are included to help you get
started by you can delete them at any time.
Logging In
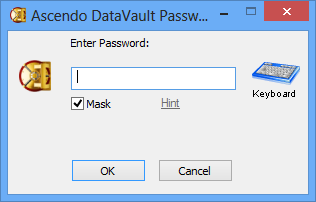
On subsequent startups you will be prompted to enter you password once.
If you are concerned keylogger software may be installed on your computer, click on the Keyboard button to use a screen keyboard.
Viewing Items in a Tree
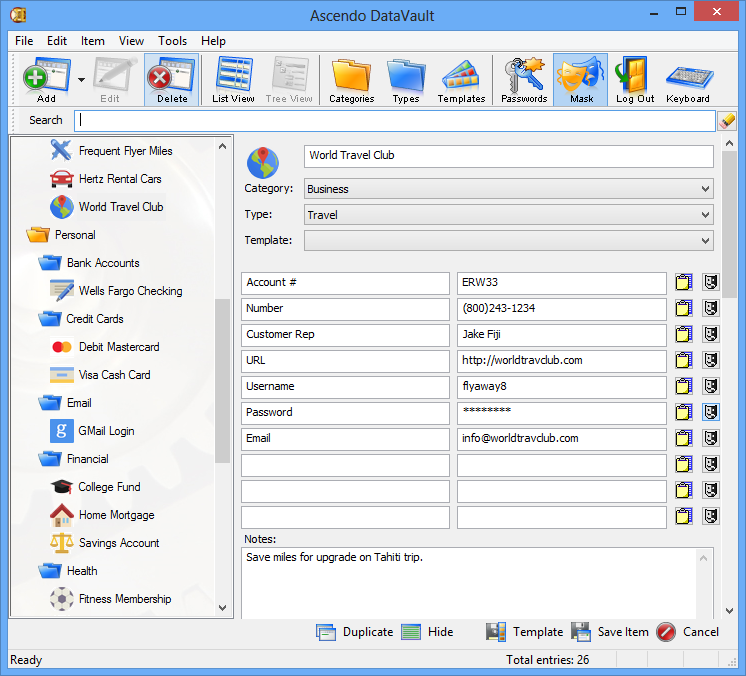
To view items in the left panel as a tree, organized by category and type folders, click on the Tree View button in the toolbar. Item details
will be displayed in the right panel.
To expand or collapse a level in the tree, click on category or type folder. To expand or collapse all levels in the tree,
select Expand All or Collapse All from the Tools menu or use the shortcuts provided.
You can change the position of types and items by tapping on an item, then changing the category and or type of an item.

Viewing Items in a List
To view items in an alphabetical list, click on the List View button in the toolbar. Item fields will appear horizontally. Use the
panel separator to increase of decrease the size of each panel.
To show more columns, click on the Hide button at the bottom left of the screen to hide the item details panel. Click on click on
the Show button to make the item details panel reappear.

Adding an Item
To add an item, click on the Add button at the top left of the toolbar. A blank form will appear in the right panel.
If you select a Template from the drop-down list, DataVault will automatically choose an icon and display field labels. However,
you can change them before saving.
If you select a category, make sure to select a type as well, or leave both Unfiled. Click on the Save button when you are done.
Editing an Item
To edit an item, double click it in the Tree of List view.
Enter an item name then click on the item icon to select from an icon matrix with 200 icons. Select a category and type from the drop
down lists. Enter field labels and contents. Alternatively, you can select a Template that will auto-fill the item icon and field labels.
When you are done, click on the Save botton at the bottom right of the window.
Deleting an Item
To delete an item, click on the item name in the Tree or List view then click on Delete in the menu bar.
Searching for Items
To search for an item, click on the Search field above the Tree of List view and start typing. Each time you type a character,
the list of items will reduce to include only those items containing the search string. For example if you type car, items such as
Mastercard and Car Registration will be displayed in the list. Clicking on the Eraser button to the right of the search bar will
clear the field and display all items.
Categories & Types
Items can be grouped into categories such as Business, Personal, etc. Each category can include several types such as Credit Cards,
Logins and Memberships. An Unfiled category and Unfiled type are created when DataVault starts for the first time. These folders
cannot be deleted.
To add, edit or delete Categories or Types, tap on the appropriate button in the toolbar. If you delete a category or type, DataVault
will ask you if you want to move nested items by tapping on the checkbox, or delete them permanently.
Templates
Templates allow you to set a default icon and field labels for items that are similar. For example, all credit cards have a number,
expiration date and security code. Instead of entering the same field labels each time you create a credit card item, you can select
the Credit Card template which will fill the field labels automatically.
DataVault comes with a set of 25 pre-defined templates.
To use a template with an item, double click on an item name to change to edit mode, then select a Template from the drop-down list.
After selecting a Template, you can change field labels at any time. To save a new Template, click on the Template button at the bottom
right of the main Window.
To add, edit or delete Templates, click on the Templates button in the menu bar.
Password Generator
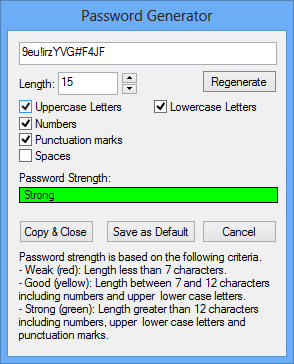
The password generator can be used to suggest new passwords based on user-defined settings. To invoke the password generator,
click on the Passwords icon in the menu bar.
You can select the length and types of characters to include in the passwords. To apply your selection, tap on the Regenerate
bottom.
To cut and paste a password, tap on the Copy & Close button. Navigate to a field and tap CTLR-V to paste.
Security Settings
DataVault provides numerous security settings to establish safeguards for accessing your data. To modify these settings, select
Tools > Options from the menu bar.
Security Timeout
A security time out is the period of inactivity after which DataVault will prompt you to re-enter your master password.
This protects you if you forget to quit DataVault.
You can change the security Timeout by selecting Tools > Options from the menu bar. Select the number of minutes to activate
the Timeout and clink on the Ok button to save.
Maximum Login Attempts
If you enter the wrong password when starting DataVault you will be alerted and given another chance. After a user-defined number of
attempts, the database will be reset. This protects you in case your device is lost or stolen and a stranger tries to
access your data.
To change this setting, select Tools > Options from the menu bar, then check off Erase data after and enter the number
of attempts you wish to allow.
Password Hint
A password hint is an optional security setting that you can use to obtain your master password if you forget it. The password hint consists of a
question and answer of your choosing. For example, you might enter "What was my fist telephone number?" as the question and then enter the
correct answer to be stored in DataVault.
If you forget your master password, you can click on the Hint button in the login window. DataVault will display the hint question and
prompt you for the answer. If you enter the correct answer, your master password will be displayed.
To setup a Password Hint, select Tools > Set Hint from the menu bar.
Backup & Restore
DataVault allows users to create a secure copy of all the items, categories, types and templates stored in DataVault using the
backup feature. You can store restore the data from this backup in case you DataVault information on your device is compromised.
To backup your data, select File > Backup from the menu bar. DataVault will suggest a filename including the data and time.
Tap the the Save button to accept the filename or select your own. Your data will be encrypted using your master password.
To backup your data automatically, select Tools > Options and check off the box for Allow automatic backups and select
how many backups to make.
To restore the data, select File > Restore from the menu bar, then select the filename of the backup you would like to restore.
Browser Integration
DataVault for Windows provides plugins for Internet Explorer, Chrome and Firefox that allow you to auto-fill web forms, save web forms and generate passwords
directly from your browser. To use the browser plugins, you must choose to install them when you install DataVault. The DataVault toolbar will appear
below the search bar or as an icon to the right of the search field in Chrome.
Field values stored in DataVault that contain internet addresses beginning with "https://" will be stored as live links to web sites. If you click on a
live link, DataVault will start your browser and open the page.
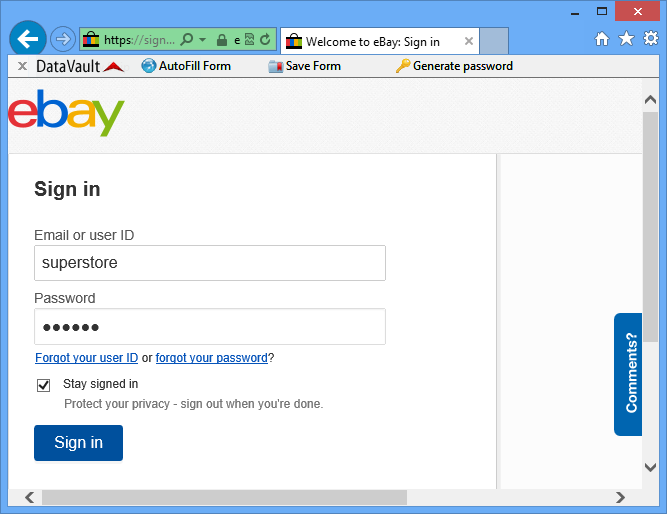
DataVault can automatically fill (auto-fill) fields in a web form such as password and username. For example, you might create an item called Ebay Login with fields
for the login page, username and password. If you click on the address (URL) for the login page, DataVault will open your browser, go to the login page and
auto-fill the username and password.
To auto-fill a form you must enter label names into DataVault that are the same as the field label names used internally by the web site. These may be different
than the web site screen labels and there is no easy way to find them apart from viewing the source code for the page. To simplify the process, DataVault
provides a Save Form feature to create items directly from web pages with the information necessary to auto-fill a form.
To use the Save Form feature, go to a web form and type in field values, see screen shot. When you have typed in all the fields you want to save, click on the
Save Form button in the DataVault toolbar. DataVault will create and display a new entry with the page title as the item name and the field labels/values
necessary to auto-fill the form. You can Edit, Save or Cancel the item in DataVault. If an Item already exists with the same URL, DataVault will ask you
if you want to overwrite the item.
To access DataVault items for internet sites, click on the Web Items button in the toolbar. A drop down list of sites will appear beneath the button.
Click on a site to go to the page.
The DataVault tool bar includes a button to Generate Passwords. When you click on the button a dialog window will appear with a randomly generated password
and several options, see section on Password Generator.
There several ways to configure the browser integration features of DataVault. To display these choices, click on Tools in the main menu and select Options
from the submenu.
The Web Form Login setting under Browser Integration determines whether on not DataVault will simulate pressing Enter/Return after auto filling a form.
If you select Automatic, DataVault will manage the login process from beginning to end with only one click. However, web sites use several methods to
manage the Enter/Return key and DataVault may not work with all sites. For this reason the Web Form Login button is initially set to User Initiated.
The Form Field Entry setting controls whether DataVault will automatically enter field values each time you go to a particular web form. If you set this
option to Automatic, the form will be filled whether or not DataVault is running. If you set the option to User Initiated, you must start DataVault and
click on a live link to auto-fill a form.
Another way to use auto-fill without having to start DataVault Desktop is to create a Windows desktop shortcut. You can create a shortcut by right clicking
on an item and selecting "Add shortcut on Desktop" from the context menu.
Synchronization
DataVault for Windows can synchronize items, categories and types with DataVault on other platforms (sold separately). Several
synchronization methods are available.
DataVault implements 2-way synchronization meaning that all additions, edits and deletions are taken into account regardless
of the device on which they are initiated. If the same piece of information is modified on two devices. DataVault prompts the user
to choose which version to keep. This is called conflict resolution.
To synchronize DataVault on two devices, the master passwords need to be the same.
An auto-sync option is available for Dropbox. Checking the auto-sync box will leave an encrypted copy of your data in the
cloud so any device can synchronize at any time. If you activate auto-sync, DataVault will check for updates on startup and
save updates when you quit.
Instructions for initiating sync from Windows are found in the sections below. Troubleshooting tips are available in FAQs on our
support page.
Sync using Dropbox
To synchronize using Dropbox you will need to setup a free Dropbox account.
You will need to login to Dropbox from both devices you want to sync, then follow the steps below on Windows.
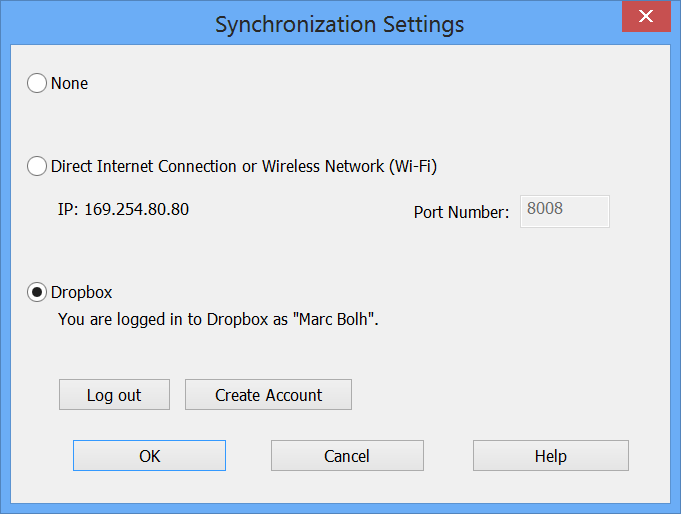
- In DataVault for Windows, select Tools > Synchronization Settings from the menu bar.
- Select Dropbox by clicking on the radio button.
- Click on Ok at the bottom of the window. DataVault should open the default browser to the Dropbox login screen.
- Login to Dropbox.
- Select the DataVault confirmation window in the task bar and click on the OK botton.
- Select the DataVault Synchronization Window and confirm that Logged in as: appears below the Dropbox selection.
- Select File > Synchronize from the DataVault for Windows menu bar.
- Start DataVault for Android. Tap on the Menu button then tap Synchronize then select Sync through Dropbox and login if necessary.
- Tap on Continue > Sync Now.
Sync using Wi-Fi
DataVault uses Apple's Bonjour discovery
service to synchronize over Wi-Fi. If iTunes is installed on your computer or you checked off the box for Bonjour setup during
DataVault installation then Bonjour should be present on your computer. If you are not sure, reinstall DataVault for Windows
checking off the box for Bonjour setup.
To initiate synchronization using Wi-Fi, select Tools > Sync Settings and make sure you have selected the radio
bottom for "Synchronize using direct Internet connection of Wi-Fi...". Then select File > Synchronize from the menu bar.
You will need to initiate DataVault synchronization on the other device you wish to sync with. See our
support page for detailed instructions for each platform.
An ad-hoc network is a direct wireless connection between your desktop and handheld device that does not require a wireless router.
Using an ad-hoc network increases the security of the connection and doesn't require access to a Wi-Fi router.
Follow the steps below to set up and an ad-hoc network on Windows computers.
- Click on the Start button and select Control Panel
- Choose Control Panel > Network & Internet > Network and Sharing Center
- Click on "Set up a connection or network"
- Click on "Set up a wireless ad-hoc (computer to computer) network"
- Choose a network name when prompted and choose a password. Make a not of the password as you will need to enter it on your handheld device.
- Check off "Save this network" then click on Next to initiate the network connection.
- To connect your iPhone to the network, tap on Settings -> Wi-Fi and choose the ad-hoc network.
Additional information about setting up an ad-hoc network on Windows is available from
Microsoft.
Importing Data
DataVault for Windows can import data from numerous sources.
- Third party password managers such as Cryptmagic, SplashID**, Illium eWallet, Code Wallet, Flex Wallet, Handy Safe, Spb Wallet, Turbo Passwords, Minisafe, Password Plus, etc.
- Comma Separated Values (*.CSV) files. Several third party password managers and productivity applications like Excel can export data in this format.
- RoboForm Passcards.
- Saved Passwords from Internet Explorer and Firefox.
- DataVault Exchange files (*.DVX).
** When importing from a SplashID vID file, you must first export the file from SplashID using a blank password.
To import data into the DataVault for Windows, select Tools from the top row menu options, then Import to display a list
of third party password managers and a submenu for CSV options. If you select one of the third party password managers, DataVault
will prompt you to "Browse..." to the appropriate directory and select a file with the file extension used by that application.
If you select Tools > Import > CSV > Custom, DataVault will prompt to select a CSV file then display the field mapping window.
CSV files are text files with commas separating fields and line breaks separating records. They can be viewed with text editors
like Notepad and imported or exported with productivity tools like Microsoft Excel.
Not all third party applications store fields in the same order. Some third party applications may include field names
(labels) such as "Username:", "Password:", etc. in the exported file. Other may include only the field values (contents).
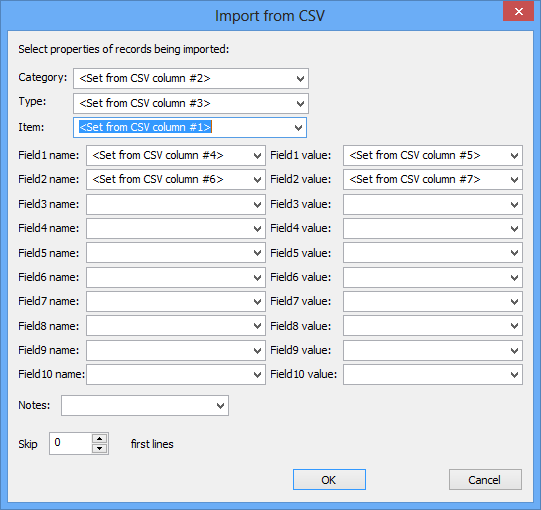
DataVault allows you to map fields in a CSV file to the order in which they are stored in DataVault, see below. For example,
a CSV file might contain a line of column headers and several items in rows.
Item, Category, Type, Label1, Value1, Label2, Value2
Citi Bank Visa, Personal, Credit Card, Number, 1111 2222 3333 4444, PIN, 2345
Wells Fargo MasterCard, Business, Credit Card, Number, 5555 6666 7777 8888, PIN, 0293
To import this file, you would make selections from the drop-down lists as displayed below and set the "Skip first lines"
parameter to 1. To download the CSV file used in this example, click here. If you assign fields incorrectly, you can delete
all of the imported items by selecting Tree View and deleting the Category or Type to which the imported
items have been assigned.
Additional articles are available for importing from
mSecure and
Yet Another Password Safe (YAPS).
|