|
Ascendo DataVault - BlackBerry Password Manager, Version 4, User Guide
Chapter 3.0 - Using DataVault on your
BlackBerry
When you install software on a BlackBerry, the
operating system places an icon in the Applications Folder. To start DataVault, open the Applications Folder and
use the track wheel or track ball to move to the DataVault icon pictured in
Figure 3. When the icon is highlighted, click on the track wheel, track ball or
return key to
start DataVault.

Figure 3
When you purchase DataVault, you should receive
a registration key with your order confirmation. If not, please contact the
company from which you bought DataVault and request a registration key. Keep your registration key in a safe
place as you may need at a later time to reinstall the application.
When you start DataVault for the first time you
will be asked to enter the Registration Code, see Figure 4. If you have a
registration key, enter it now and click on the Register button. If your trial period has
not expired, you can click on the Register Later button to continue using
DataVault. Once the trial period
has expired, you must purchase DataVault and enter the registration key to
continue using the product.
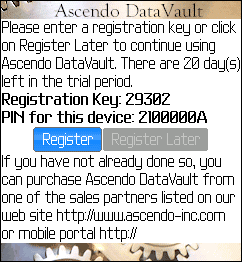
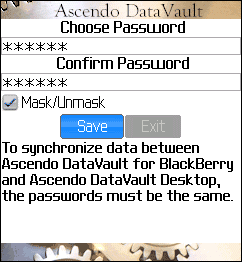
Figure 4
Figure 5
3.1 Choosing a Password
Once you have registered DataVault or selected
the "Register Later" option, the Password Selection screen will be
displayed, see Figure 5. You will be asked to select a password and then to retype the password
so that DataVault can alert you if you made a mistake.
In order to provide the most secure environment
possible, your password is not stored anywhere in the application. Instead,
DataVault uses your password an encryption key to encode or decode your data.
DataVault employs Advanced Encryption Standard (AES), the official choice of the
US government. It is important that
you make a note of this password because you will not be able to access
DataVault information without it.
On subsequent start-ups, you will be prompted to
type the password only once. The characters will appear briefly, then they will be
masked to protect them from prying eyes. You can choose to unmask
the password by moving to the mask/unmask check box and clicking on the space
bar. You may change your password at a later time.
A Reset Password button is displayed in the
lower right hand corner of the password box. This option should only be used if
you lose your password. Resetting your
password will erase all of your data. You can set a password hint using Ascendo
DataVault Desktop.
3.2 BlackBerry Start-Up Screen
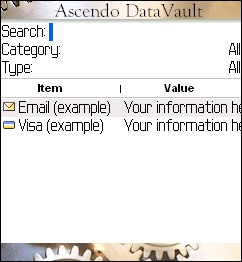
Once you have entered your password for the
first time, the Initial Start-Up Screen will be displayed, see Figure 6. The
cursor will appear next to the Search label at the top of the screen. You will
see a sample Email and Visa Item which you can edit or delete.
When you
enter characters into the Search field, the list of items will be reduced to display only the
items
that contain the string of characters you entered. See chapter on List View for
more information on searching for Items.
Figure
6
Figure 7
Just below the Search field you will see Category and Type filters which have
default to "All". For more information on using Categories and Types,
see section on using List View.
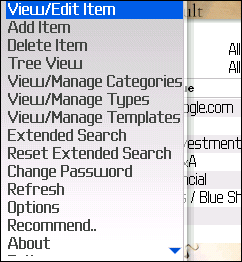
To access the screen menu (Figure 7), click on
the BlackBerry key to the left of the track ball. On devices that do not have a
track ball, move the cursor to the Search field and click on the track wheel.
Use the track wheel/ball to scroll through the
menu choices then click on the track wheel/ball or Return Key to select an
option.
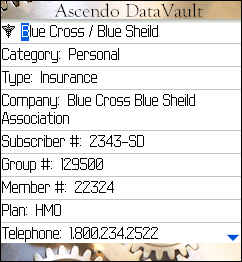
3.3 Viewing and Editing Items
To view all the fields of an item, use the
track wheel/ball to scroll to and highlight an item in the list. Click on the
track ball again to go to the item details screen, see Figure 8. Alternatively,
you can click on the track wheel or BlackBerry key to display the screen options
menu then select View.
Figure
8
Figure 9
The Items View Screen displays the
item icon, name, category, type, field labels, field values and notes. The item
icon and name are displayed on the top row. The field labels and values are
displayed on the next rows separated by a colon. If a field
value is longer than the available space in the line, DataVault will use word
wrap to continue the description on the next line. Each field value can be up to
256 characters in length. There are ten fields for each item. DataVault will
only display the fields that are not blank. The notes field is displayed after
the field rows and can be up to 10,000 characters in length.
The blue down arrow on the lower right-hand
side of the screen indicates that there is more information below. You can use the track wheel/ball or press the
Return Key repeatedly to scroll down the screen.
There are several shortcuts available from the
Item View Screen. Clicking on the "E" key or track ball will switch to
Edit mode, see Figure 9. Clicking on "N" will move to the next item.
Clicking on "P" will move to the previous item. Clicking on the "C" key will copy the
contents of the field value in the cursor row to the BlackBerry clipboard. You
can Paste this information into other DataVault fields or other applications by
using ALT-Backspace to switch to another application then selecting Paste from
suitable screen menus.
To display the screen menu in View mode, click
on the BlackBerry key or the track wheel. Use the track wheel/ball to scroll
through the menu options and click on the track wheel/ball again to select a
menu option. Several options are available from the screen menu.
- Back: Go to List View or Tree View.
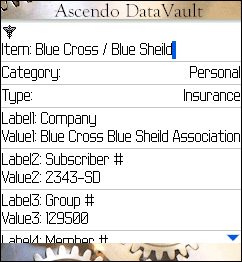
- Edit: Go to Edit mode, see Figure 9.
- Call: Initiate a telephone call using the
contents of the field value as the telephone number.
- Open URL in browser: Start the BlackBerry
browser and go to a web site using the contents of the field value as the
URL.
- Copy To Clipboard: Copies the contents of
the field value to the BlackBerry clipboard.
The Edit Item Screen (Figure 9) allows you to
change all the information associated with an item. Item field labels and values
are displayed on two rows to maximize the space available to see your edits. All
fields and the notes section are displayed even when they are blank.
To save time entering information you can
select a Template from the screen menu that will automatically fill in the item
icon and field labels. A list of 20 predefined templates has been included but
you can add, edit and delete templates as you wish.
To modify the item name, field labels, field
values or item notes, use the track wheel/ball to navigate and then start
typing. To clear the field, select Clear Field from the screen menu. To go to
the beginning of a field, move to the field from the field above it. To go to
the end of a field, move to the field from the field below it.
If you select the Password Generator option
from the screen menu, DataVault will automatically generate a random password
based on your presets and display a menu option to copy it into the cursor
field.
To change the item icon, click on the
BlackBerry key or track wheel and select Change Icon from the screen menu. The
Icons Screen will appear containing 100 icons that you can associate with an
item, see Figure 10. To select an icon, use the track wheel/ball to move to an
icon. When the icon you want is highlighted by a blue box, click on the track
ball or return key again to select the icon and go to the Edit screen.

Figure
10
To change the Category or Type, use the track
wheel/ball to move to the respective field values, "Personal" or
"Insurance" in Figure 9 and then click on the track ball to display
the list of options. With track wheel devices, move to the field, click on the
track wheel and select Change Option from the screen menu. Alternatively, you
can move to the fields and click on the space bar to cycle through the list of
options.
To save your edits, click on the track
wheel/ball and select Save from the screen menu. If you have not edited the item
and click on the BlackBerry Escape/Back key, you will return directly to List or
Tree View. If you have made edit you will be prompted to Save, Discard or Cancel
your modifications.
3.4 Adding and Deleting Items
To Add an Item, go to the List View or Tree
View screen and click on the track wheel/ball to display the screen menu. Select
Add Item to go to the Edit Item Screen.
To speed data entry, DataVault provides a
Duplicate Item feature. To duplicate an item, scroll to the item in List/Tree
View, click on the BlackBerry key or track wheel to display the screen menu, and
select Duplicate Item. DataVault will create a second item with
"(copy)" entered next to the Item name. All the other fields will be
the same.
To delete an item, move to item using the track
wheel/ball
and click on the track wheel/ball. Select Delete Item and choose Yes to confirm.
If you have a similar item in Ascendo DataVault Desktop and want to undelete the
entry on your BlackBerry, you can synchronize your BlackBerry and Desktop, see
section on Synchronization.
3.5 Using Templates
The option for Select Template on the Edit Item
screen menu allows you to choose from a set of pre-defined item entry formats.
Each format has a default icon and default field labels. For example,
you might have a template called "Email Login" with predefined
settings including the envelope icon and field labels for URL, Username,
Password, Pop and SMTP settings.
DataVault comes with a set of 20 predefined
templates which you can edit or delete. You can add an templates as well and you
are limited only by available disk space.
When you synchronize Ascendo DataVault for
BlackBerry with Ascendo DataVault Desktop, templates are included in the
process.
Templates are independent of Categories and
Types so you could use a Visa template with an item filed under
Business(Category) > Bank(Type) or Personal(Category) > Credit Card(Type).
After selecting a template, you are free to change any of the field labels
on-the-fly.
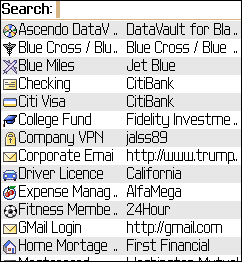
3.6 Displaying Items in List
View
Once you have added several Items, you might have
a List that looks similar to the one in Figure 11.

Figure
11
You can use the track ball to Roll & Scroll
TM vertically through items and
horizontally across fields. When you scroll down the list of items, the field
labels for the highlighted item are displayed on the header line. In the example
in Figure 11, the Blue C...(Blue Cross) item display the field labels; Company,
Subscriber #, Group #, etc. in the headers. When you move to a different item,
the field labels change accordingly.
When you
enter characters into the Search field, the list of items will be reduced to display only the
items
that contain the string of characters you entered. For example, if you type "v"
then only the Visa entry will appear. If you have set the View Item option to
Automatically, the item details screen will appear because there is only one
entry starting with that letter.
When there are several items in the list that
match your search string, you can click on the BlackBerry Delete key to back up
one character. To see all of the entries again, click on
the BlackBerry backspace key which will clear the Search field.
Just below the Search field you will see Category and Type filters which have
default to "All". You can set a
filter to display only the items in a specific Category or Type. To do this, use
the track wheel or track ball to move the
cursor to "All". When All is highlighted, click on the track
wheel/ball again to show a drop down list of choices. Use the track wheel/ball
to move through the list. Click on one of the choices to set the filter.
Alternatively, you can press the BlackBerry Space key to cycle through choices. If
you set a Category or Type filter and search for entries, only items in the Category and/or
Type you have selected will be displayed when searching.
To display all fields and notes for an item, scroll
and highlight the item and then click on item.
You can customize the List View by selecting
Options from the screen menu.
- Row Color: The color used to highlight the
current row and header dividers.
- Table Color: The color used as the
background for alternating rows.
- Font Family, Size and Style: Modifies font
used for Item rows.
- Skin Style: Changes graphic along top and
bottom of screen.
- Show Skin: Display Top, Bottom, Both or
Neither (None).
- Personalization Lines: Use different
background color for alternating item rows.
- Show Columns in Table: Select number of
columns to display for each item.
- Table Header: Show or Hide the table header,
ie (Name, Company, Subscri...).
- Table Filter: Show or Hide Category and Type
filters.
- Item Name Column: Anchor (fix) the Item name
when scrolling across fields.
Using the customization options, you may
choose to hide all screen elements except for the Search field and the list of
items in order to maximize the available screen space available to display item records,
see Figure 12.
Figure
12
If you click on the BlackBerry key or track
ball a screen menu will appear with the following options, see Figure 7.
- View Item: Go to Item View Screen to show
all fields.
- Edit Item: Go to Item Edit Screen to modify
all fields.
- Add Item: Create a new item.
- Duplicate Item: Create a new item with
"(Copy)" after the item name.
- Delete Item: Remove an item from the
database.
- Tree View: Switch to Tree View.
- Categories: Select, Add, Edit or Delete
Categories.
- Types: Select, Add, Edit or Delete Types.
- Templates: Select, Add, Edit or Delete
Templates.
- Extended Search: Search through all or
selected fields for search string.
- Reset Extended Search: Reset to search only
on item name.
- Import BlackBerry Memo: Import and encrypt
BlackBerry Memo.
- Change Password: Select a new Master
Password.
- Refresh: Update and display items after synchronization.
- Options: Set customization settings.
- Recommend: Send email recommending
DataVault.
- About: Display version number and
registration key (if purchased).
3.7 Displaying Items in Tree
View
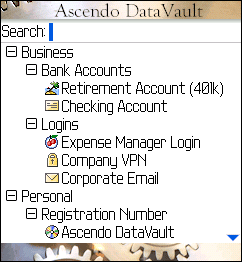
The Tree View displays items as a three level tree
where the first level is the Category, the second level is the Type and the
third level
is the Item, see Figure 13.
Figure
13
If a Category or Type has a minus sign ("-")
or an open folder to the left of it then you can collapse that level of the tree
by highlighting the branch and clicking on the track ball/wheel. Alternatively,
you can click on the space bar close a branches. For example, if you collapse the "Business" category, Bank
Accounts, Logins and associated items no longer appear.
If a Category or Type has a plus sign
("+") or a closed folder to the left of it, you can expand the branch
to show all Types and Items belonging to the branch. If you move back to the
"Business" category and click on the Space key, Bank Accounts and
Logins will reappear.
The customization options in the Tree View are
the same as for List View (see section on List View) but include an additional
choice. The Option for Default Tree Status can be set to Expanded, Collapsed or
Last. If you select Expanded or Collapsed, all branches will be displayed in the
chosen formation when you switch to Tree View. If you select Last, the branches
will be displayed in same the formation as when you left Tree View or quit
DataVault. The Last formation may include various combinations of collapsed or
expanded Categories & Trees.
The screen menu options are similar to List
View (see section on List View) but include tow additional choices. Expand All
will open all branches in the Tree. Collapse All will close all branches in the
Tree.
You can Search the database in the Tree View as
well. Items containing the characters you enter after the "Search:"
label will appear in the Tree.
3.8 Searching for Items
You can search on the Item name from the List
View or Tree View screens, see Figures 11 & 13.
When you go to the List or Tree View, the cursor will
appear next to the "Search:" label. There two methods for searching by
typing characters in the search field. If you select Option from the screen menu
and set the Search method to "By 1st Character", then typing
"e" into the search field will reduce the list to items starting with
"e" such as E*Trade, Ebay, etc. If you select "On String"
then type mail in the Search field, the list will reduce to all items containing
"mail" such as Hotmail, GMail, etc. To see all of the entries again, click on the
Escape/Back key once or click on the Delete key repeatedly until there are no characters left in the Search field.
An alternative way to find items is to cycle
through items beginning with a certain character, similar to the way you can
cycle though items in a BlackBerry screen menu. To do this, use the track
ball/wheel to move
down to the first item. Type the first letter of the item you are
interested in. For example, type "v" for Visa. DataVault will move to
the first item beginning with "v". Type "v" repeatedly to
cycle through other items begging with "v".
When the list reduces to one item you have two
navigation options. The first is to go to the View Item screen
"Automatically". The second is to require the user to confirm
"Manually" before going to the View Item screen. To set this
navigation parameter, select Options from the List/Tree View screen menu and set
View Item to Automatically or Manually.
DataVault provides an Extended Search feature to allow you to
search on all 10 field values and the Notes field. This can be useful, if the first thing that comes to mind when
searching for your
Health Insurance is your doctor's name. Standard search would look through item
names and would not find your doctor's name if it was in one of the other
fields. Extended search would find the item if you specified that all fields and
notes should be searched.
The Extended Search option is available from
the List View or Tree View screen menus. Check or uncheck the boxes next to the
field names that you want to search through.
To show all the Items again, select "Clear
Extended Search" from the List or Tree View screen menus.
3.9 Other BlackBerry Features
Several additional features included in Ascendo
DataVault for BlackBerry are described in the sections below.
3.9.1 Encrypting and Decrypting
Emails
DataVault for BlackBerry allows you to encrypt
and decrypt emails using the standard BlackBerry email client. This can be
useful for sending sensitive information to a confidant or colleague. Opening
encrypted emails requires that the receiver has DataVault installed on
their handset.
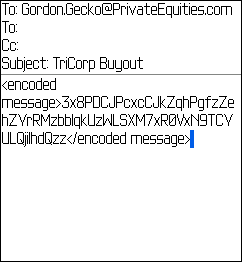
To encrypt an email using DataVault, open the
BlackBerry email client and select Compose Email from the menu. When you are
finished writing the email, click on the track ball or track wheel to display
the screen menu and select "Encrypt with DataVault". You will be
prompted to select a password. It is recommended that you select a password
different from your DataVault master password. After you enter your password,
the body of your email will be encoded into a string of encrypted characters,
see Figure 14.
Figure
14
Figure 15
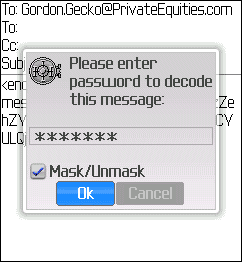
To decrypt an email, open the email with the
BlackBerry email client and select "Decrypt with DataVault" from the
screen menu. When prompted, enter the password used to encrypt the email, see
Figure 15.
You do not have to start DataVault to encrypt
or decrypt an email.
3.9.2 BlackBerry Browser
Integration
Ascendo DataVault for BlackBerry offers the
possibility to automatically fill some web forms using the BlackBerry Internet
Browser. To use this feature, follow the steps described below.
- Start Ascendo DataVault Desktop and save a
login form as described in Chapter
4, Section 8.
- Synchronize Ascendo DataVault Desktop with
Ascendo DataVault for BlackBerry as described in Chapter
5.
- Start Ascendo DataVault for BlackBerry and
open the item details screen.
- Select "Fill the URL in browser"
from the Screen Menu.
Ascendo DataVault for BlackBerry will start
your BlackBerry browser, go to the URL specified in the item record and fill in
the form fields.
Due to limitations in the programming
interfaces available to developers for the BlackBerry Internet Browser, not all
login forms are supported. Some sites that have been tested by Ascendo are
Gmail.com and Yahoo email.
|
