User Guide - Ascendo Money - Personal Finance Manager for BlackBerry - Version 3
Chapter 3 - Using Ascendo Money for BlackBerry
When you install software on a BlackBerry, an application icon is placed on
the home screen. On some devices, the application icon is placed in the
Applications Folder or Download Folder. To start Ascendo Money,
use the track ball or track wheel to move to the appropriate folder, highlight
the Ascendo Money icon pictured in Figure 2, then click on the icon to start Money.

Figure 2
Section 3.1 - Managing Accounts
The first screen
displayed when you start Ascendo Money is the Accounts screen, see Figure 3. A
few sample accounts are created when you install Money but you can delete or
modify them at any time.
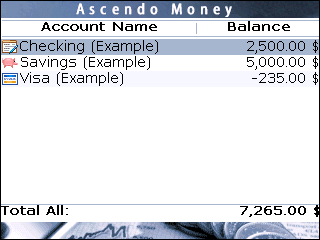
Figure 3
Ascendo
Money will display the total of the default currency in the lower left of
the screen. If you have accounts with multiple currencies, you can use the
track ball/wheel to move to and highlight the Total All value and click on
it to display the totals of accounts in other currencies.
To
display the screen menu with the features available from the accounts screen
(Figure 4), click on the BlackBerry Key to the left of the track
ball/wheel.
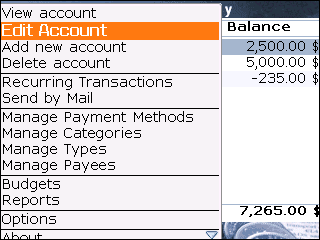
Figure 4
View
Account (View Register) will display the transaction Register when your
expenditures and deposits are listed.
Edit
Account will allow you to change the account name, icon, initial balance
date, initial balance amount and user defined field label, see Figure 5.
Add
New Account will allow you to create a new account.
Delete
Account will delete the highlighted account. If you delete and account, all
of the transactions associated with the account will be deleted.
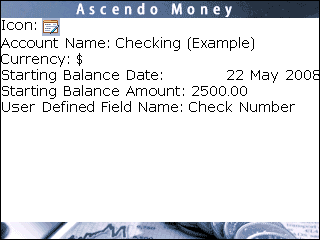
Figure 5
To select a new icon,
highlight the icon, click on the BlackBerry key and select Change Option. A
screen will appear with 100 icons, see Figure 6. Use the track ball to navigate
through the icons then click on the track ball to select an icon and return to
the account edit screen.
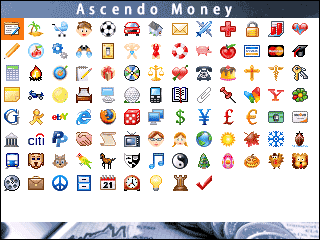
Figure 6
To
select a currency symbol, click on the “SYM” key on your BlackBerry.
When
you create an account, you may want to set the Starting Balance Date and
Starting Balance Amount using a bank statement. All transactions entered on
or after the Initial Balance Date will be reflected in the account balance.
If you fall behind on entering transactions, you may want to reset your
Starting Balance Date and Starting Balance amount to the most current bank
statement.
Each
account has a user defined field. You can set the field name to anything you
like and it will be displayed on the transaction form along with a value
field. In this example, the field name has been set to “Check Number” so
that when you enter you checking withdrawals, you can record the check
number.
Section 3.2 - Using Transaction Registers
The
Account Register is used to manage withdrawals and deposits to as well as
keep track of the account balance. To display the Account Register, go to
the accounts screen, roll the track ball/wheel to highlight an account, then
click on the track ball/wheel to display the account register.
When
you use Ascendo Money for the first time, several sample transactions will
appear, see Figure 7. You can delete or edit these transactions.
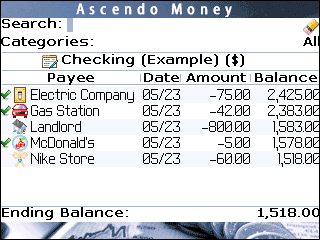
Figure 7
The
transaction list displays several columns but there are more fields off the
right side of screen. In addition, there may be more transactions below the
screen depending on how many transactions you have entered. Ascendo Money
provides a Roll & Scroll TM feature that allows you to
navigate quickly and easily to the information you want. To use this
feature, use the track ball/wheel to highlight one of the transactions. Then
simply roll the track ball left or right to move horizontally across the
fields or roll the track ball up and down to move vertically through the
transactions.
Section 3.2.1 - Searching and Filtering Transactions
When
the register screen first appears, the cursor will be in the Search field.
If you start typing characters, Ascendo Money will reduce the list to only
those transactions for which Payee starts with the search string. For
example, if you start typing “m”, only the McDonald’s entry will appear in the
list. To clear the search field and display all transactions, click on the
BlackBerry escape key or the pencil button to the right of the Search field.
The
Categories field allows you to reduce the list to only transactions of a
particular category such as
Meals, Clothing, Entertainment. To select a category, roll the track ball to highlight
the Categories field value then click on the BlackBerry Key and select
change option. Alternatively, you can highlight the Categories field and
click on the space bar repeatedly to cycle through choices.
Section 3.2.2 - Adding, Editing and
Deleting Transactions
The transaction register screen menu provides several
options to manage transactions, see Figure 9. To display the screen menu,
click on the BlackBerry menu key.
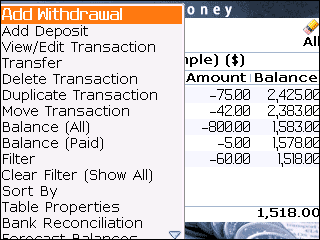
Figure 9
From this menu you
can add a new transaction. Ascendo Money includes several features that
allow you to add transactions quickly. The transaction date will be set to
the current date and the cursor will be placed in the Payee field.
When you start
typing characters into the Payee field, Ascendo Money will automatically
suggest Payees. For example, if you start typing “E” then “Electric
Company” will be suggested. If this is not the payee you want then
continue typing. If it is the payee you want, then click on the return key
to automatically complete the entry and move to the amount field.
Payees are stored
in a separate database and have several default values associated with them
for Payment Method, Status, Category and Type. So if you select a payee
already in the databases, each of these fields will automatically be set to
the default values you have selected. For example, if you select Electric
Company, the Payment Method will automatically be set to ETF (Outgoing),
status will be set to “Unpaid”, Category will be set to “Utilities”
and Type will be set to “Personal Expenses”. You can override the
defaults by moving the these fields and selecting other choices.
You can view or
edit a transaction by highlighting and click on it in the transaction list
or by choosing View/Edit from the screen menu. To save your modifications,
click on the BlackBerry key or track ball and select Save from the screen
menu, see figure 10.
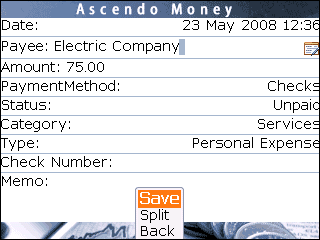
Figure 10
Section 3.2.3 - Splitting Transactions
Each transaction
amount can be split across several categories. For example, you might
purchase food and gifts in an airport store and classify the food as a
business expense and the gifts as a personal expense. To do this, select
Split
from the screen menu to display the transaction splitter screen, see figure
11.
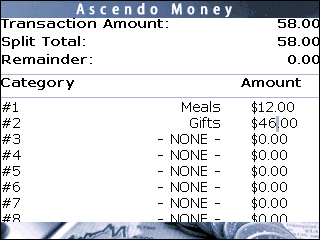
Figure 11
In the list below the remainder field, select categories an type amounts to
allocate to each category. Ascendo Money will display the total of the
amounts you have allocated in the Split Total field.
The difference between the transaction amount and the total allocated
is displayed in the remainder field. When the remainder is 0, you have
allocated the entire transaction amount.
Section 3.2.4 -
Transferring Money between Accounts
Transfers can be used to move money from one account to another. For
example, you may want to move money from your checking account to your
savings account. Instead of having to create two transactions manually,
Ascendo Money allows you to create a transfer in one step.
To display the
transfer screen in figure 12, select Transfer from the accounts screen menu.
Enter the amount you want to transfer and select the account from which you
would like to withdraw the money and the account into which you would like
to deposit the money. To select an account, use the track ball/wheel to
highlight the account selection value and click on the track ball/wheel to
display the choices. Highlight your choice and click on the track ball/wheel
to select the new value.
Ascendo Money
will create two transactions; a debit from the source account with Payee set
to "Transfer to Account Name", and a credit in the
destination account with the Payee set to "Transfer from Account
Name". Both transactions will be set to the amount you specified.
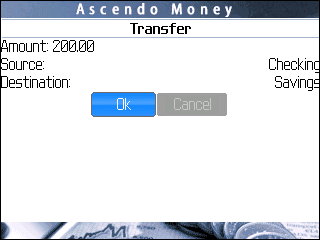
Figure 12
Section 3.3 - Managing Payees
Payees are people
or companies that receive payments from you, or that make payments to you. For
example, you may create a Payee named Vons Supermarket and record debit card
payments for groceries or a Payee with your employer’s company name to
record automatic salary deposits.
To manage Payees,
go to the Accounts Screen, click on the BlackBerry key and select “Manage
Payees” from the screen menu. The Payees will appear in a list displaying
the Payee name and Memo fields, see figure 13.
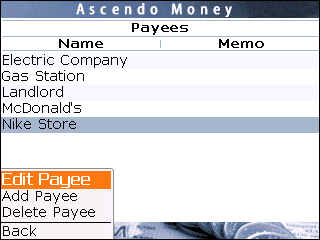
Figure 13
To
add or delete a Payee, roll the track ball/wheel to highlight a Payee, then
click the BlackBerry key to and select the desired action from the screen
menu. You can edit a Payee using the screen menu or by simply highlighting
and clicking on it with the track ball/wheel.
When
you shop at a store on a regular basis, you probably pay with the same
credit card want to categorize the purchase the same way. Ascendo Money
allows you to set up Payees with default values for Payment Method,
transaction Status, Category and Type, see figure 14.
When
you create a transaction and select a payee from the Payee database, these
fields will automatically be set to their default values. This speeds
transaction entry considerably however, you can override the defaults at any
time.
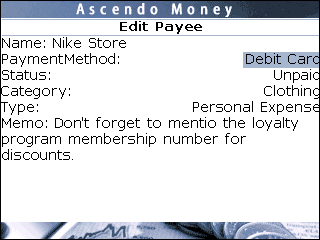
Figure 14
In
addition, each payee record includes a memo field to store information
specific to that Payee such as vendor contact information or purchasing
tips.
3.4 Payment
Methods, Status, Categories & Types
Each transaction
includes information on the payment method, transaction status, category and
type of the transaction. You can use this information to sort transactions
and display reports on your spending habits.
You can add, edit
and delete Payment Methods. The default Payment Types are listed in
the table below. Each payment
method must be declared as a withdrawal or a deposit to that Ascendo Money
knows whether to add or subtract the amount from the account balance.
For example, if you enter a
payment to your cable company and select EFT (Bill Pay), the amount will be
recorded as a withdrawal and subtracted from your balance. If you enter a
transaction for your salary and select EFT (Direct Deposit), the amount will
be recorded as a deposit to your account and added to the account balance.
|
Type
|
Withdrawal or Deposit
|
|
Withdrawal
|
Withdrawal
|
|
Deposit
|
Deposit
|
|
ATM
|
Withdrawal
|
|
Check
|
Withdrawal
|
|
Credit Card
|
Withdrawal
|
|
Debit Card
|
Withdrawal
|
|
EFT (Bill Pay)
|
Withdrawal
|
|
EFT (Direct Deposit)
|
Deposit
|
|
Paypal (To)
|
Withdrawal
|
|
Paypal (From)
|
Deposit
|
|
Wire Transfer (Outgoing)
|
Withdrawal
|
|
Wire Transfer (Incoming)
|
Deposit
|
A transaction's
Status
indicates whether it has has been processed by your bank. For
example, you may write a check for a purchase but the check may clear the
bank a week later. Tracking the status of transactions can be useful to
verify if your account is about to go negative in order to avoid bank fees
or interest payments.
You can add, edit
and delete transaction status types. The default status types are listed in
the table below.
|
Status
|
Paid
or Unpaid
|
|
UnCleared
|
Unpaid
|
|
Cleared
|
Paid
|
|
Unpaid
|
Unpaid
|
|
Paid
|
Paid
|
|
Unreconciled
|
Unpaid
|
|
Reconciled
|
Paid
|
|
Imported
|
Unpaid
|
|
Downloaded
|
Unpaid
|
|
Undetermined
|
Unpaid
|
|
Void
|
Unpaid
|
Categories and
Types allow you to classify transactions in order to better understand you
spending habits. For example, you might want to create a category for Meals
to track how much you spend each month.
Types
allow you to further classify transactions. For example, some of the
transactions in the Meals category could be personal
while others could be business related.
You can add, edit
and delete categories and types. When you start Ascendo Money for the first
time, there are several predefined categories such as Automotive, Clothing,
Entertainment, etc. and types such as Business Expense, Personal Expense,
etc.
3.5 Managing
Budgets
Budgets allow you
to specify an amount that you would like to spend every month for
transactions of a certain category. For example, you may budget $250 per
month on clothing. If you buy a shirt and jeans for $125, you will have
spend 50% of your budget.
Budgets are set in the Category management screen. To set budgets, go to the
Accounts screen, click on the track ball/wheel to display the screen menu
and select Manage Categories, see figure 15.
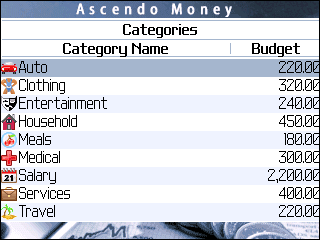
Figure 15
To set a
budget, use the track ball/wheel to scroll down the list of categories and
click on the track ball/wheel to open the category edit screen. You can set
the Monthly Budget and choose if the category is an Expense or Income
Budget. Expense budgets are things you spend money on like meals or
utilities. An income budget could be used for revenues like salary or
consulting fees.
To
determine whether you are over or under budget for a category, go to the
accounts screen and select Budgets from the screen menu, see figure 16.
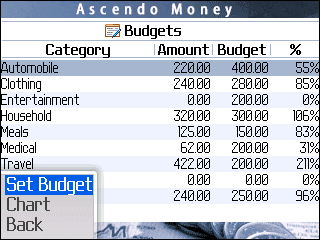
Figure 16
The
category budget screen contains the Category Names in alphabetical order and
several other columns. The Amount column contains the sum of all
transactions of a category for the current month. The Budget column contains
the budget you choose for the category. The "%" column is the
percentage of budget that you have attained. A percentage under 100%
signifies that you have money left to spend on the category. A percentage
over 100% signifies that you have gone over budget.
You
can set a budget and display a bar chart from the Budgets screen by clicking
on the track ball/wheel and select the option from the screen menu. Bar
charts display the categories in descending order of budget percentage
attained, see figure 17. You can use the track ball/wheel to move to
categories off the bottom of the screen.
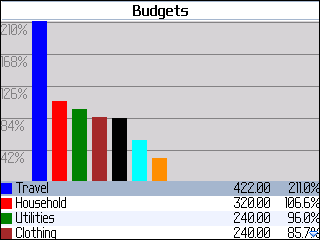
Figure 17
3.6
Reports
Ascendo
Money provides numerous reports to help you analyze your financial
situation. To select a report, go to the accounts screen and select Reports
from the screen menu. A dialogue box with several report options will
appear, see Figure 18.
There
are several report types; Spending by Payee, Spending by Category,
Spending by Payment Method, Spending by Type and Deposits vs Withdrawals.
You can choose to display the data from one account or from all accounts.
The beginning and ending dates will determine the transactions that Ascendo Money
uses to create the
report. You can choose to view the report as a Pie Chart, Bar
Chart or in List View.
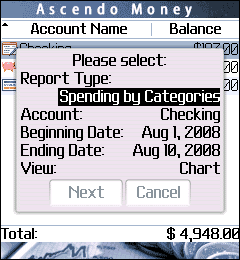
Figure
18
Figure 19
3.7
Scheduling Recurring Transactions
Some transactions occur repeatedly, such as
salary deposits or mortgage payments. To avoid entering the same transaction
over and over, Ascendo Money enables you to schedule recurring transactions for
a payee based on the frequency that you specified.
To
schedule a recurring transaction, go to the accounts screen and select
Schedule Transaction from the screen menu. A list of scheduled transactions
will be displayed. Now select Add Recurring Rule from the screen menu to
display the Recurring Rule screen, see Figure 20.
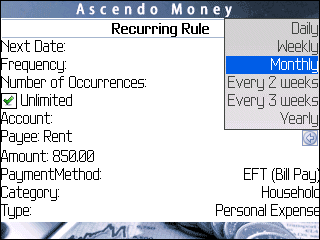
Figure 10
Scheduled
transactions will be created every time you start Ascendo Money based on the
date and the frequency you selected. For example, you could set up a
scheduled rent payment of $850.00 to occur every month. The Next Date is the
first date on which the transaction would occur. If you select next date to
be June 1st, then a Rent transaction would be created when you start Ascendo
Money on June 1st, July 1st, August 1st etc. You can specify a certain
number of occurrences or choose unlimited by checking the box.
3.8
Customization
Options
Ascendo
Money for BlackBerry includes numerous user defined settings to to customize
fonts, colors, screen layouts and navigation. To
set these parameters, select Options from the Accounts screen menu, see
Figures 21 and 22.

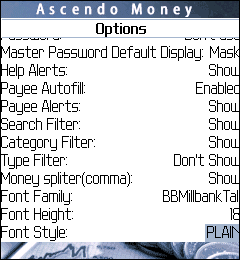
Figure
21
Figure 22
3.9
Other Features
Ascendo Money for BlackBerry contains many of features to
help you achieve your financial goals.
3.9.1
Reconciling Accounts
Reconciling bank statements with transaction
registers can be useful to determine if there are fraudulent charges or
expenditures that you forgot to make note of. Ascendo Money provides an account
reconciliation feature for this purpose. To reconcile an account, select
Reconcile Account from the transaction register screen menu. Enter the beginning and
ending date of the period you want to reconcile. Ascendo Money calculates
beginning balance, ending balance, sum of reconciled transactions and the
difference, or un-reconciled amount.
3.9.2
Forecasting Account Balances
Ascendo Money allows you to forecast account balances at future dates. This can be helpful to adjust your spending
until the next payday. Ascendo Money will calculate your balance at any date
based on your current balance and scheduled transactions. To forecast a balance,
go to the transaction register screen and select Forecast from the screen
menu.
3.9.3
Purging
Transactions
Over
time, the number of transactions that you store in Ascendo Money may begin
to effect performance. You can purge transactions between a date range to
improve performance. Ascendo Money will remove these transactions and update
account balances. To purge transactions, go to the accounts screen and
select Purge from the screen menu.
|

