User Guide - Ascendo Money - Personal Finance Manager for BlackBerry - Version 3
Chapter 4 - Using Ascendo Money Desktop
When you install software on a Windows PC, an application icon is placed on
the desktop, see Figure 23. Double-click on the icon to start Ascendo Money
Desktop. Alternatively, you can start Ascendo Money from the Widows start menu.
Click on the Start button, then click on All Programs. Scroll the list to find
the sub-menu for Ascendo Money, then open the submenu and click on Money.

Figure 23
The
Ascendo Money main screen displays accounts in the left-hand panel and the
transaction register for the highlighted account in the right-hand panel,
see Figure 24. When you first start Ascendo Money, a few sample accounts and
transactions have been created but you can edit or delete them at any time.
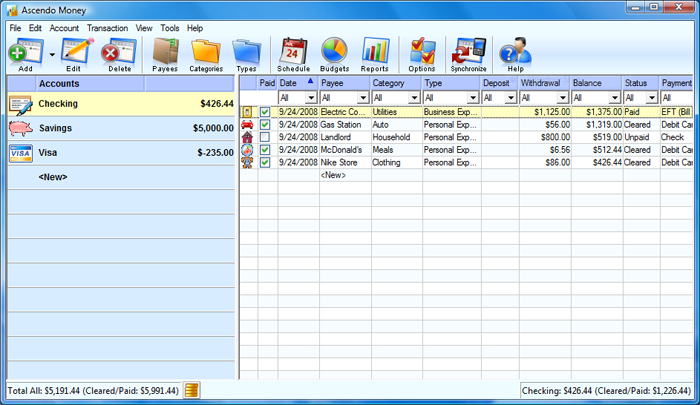
Figure 24
The main text menu can be seen
along the top of the screen starting with the File menu. Click on the main
menu options to display submenus. A row of buttons is displayed underneath
the text menu to provide and quick and intuitive way to access regularly
used features.
You
can hide the account or transaction register panel by moving the divider to
the right or left. To show both panels again, move the divider closer to the
center of the screen.
Accounts and transactions can
be displayed in ascending or descending order by clicking on the column
headers.
Balances appear along the
bottom of the screen to indicated the sum of all transactions or the sum of
cleared or paid transactions.
Section 4.1 - Managing Accounts
Ascendo Money allows you to create an unlimited number of accounts
such as Checking, Savings, Debit Card, Credit Card, Retirement, Investments, etc.
Each account has a transaction register to manage deposits, withdrawals and
expenditures.
To add an account, click on
<New> at the bottom of the accounts list. Alternatively, you can click
on the arrow to the right of the Add button at the top of the Window and
select Add Account from the list. A form will appear containing several
fields, see Figure 25.
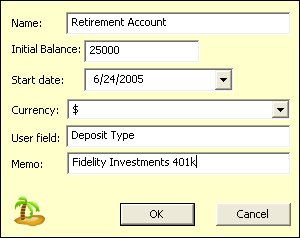
Figure 25
Enter an account name, initial balance,
balance start date and currency. Ascendo Money will calculate running,
ending and cleared balances by adding deposits and subtracting withdrawals
from the initial balance. Only transactions occurring on, or after the start
date with be used to determine balances. If your balances do not match with
your bank statement and you don't have the time to reconcile previous
transactions, you may want to move the initial balance and start date
forward to match your most recent bank statement.
The User field allows you to enter the field
label to be used for a field that you define in the transaction register.
For example, you could enter "Check Number" for checking accounts
to record the number of each check you write. In the example above (Figure
25), the user has set the User field label to "Deposit Type" and
could be used to record whether transactions in the account are deposits,
interest or dividends.
To edit an account, double
click on the account name in the account panel and the account form will
appear. To delete an account, highlight the account row and and click on the
Delete button. If you delete and account, all the transactions associated
with the account will be deleted as well.
At the bottom of the accounts
panel, two balances and and icon are displayed. The Total All field contains
the sum of all the accounts in the default currency. If all your accounts
are entered into Ascendo Money and they have been set to the same currency,
then the Total All is your net worth.
The Cleared/Paid column is the
sum of all transactions in the accounts that have a status set to cleared or
paid, meaning they have cleared your bank.
If you have accounts with
different currencies, Ascendo Money will display balances for accounts that
have been set to the default currency. You can change the currency used for
balances by clicking on the stack of coins icon to the right of the balances
and selecting another currency.
Section 4.2 - Using Transaction
Registers
Each account includes a transaction register to
track deposits, withdrawals and expenditures. For
example, you could create a personal checking account and record entries for
salary deposits, checks you write or debit card purchases. The
transaction register displays running and ending balances to help you avoid
overdrafts.
Section 4.2.1 - Filtering Transactions
You can filter transactions in the register
using the drop down fields below the column headers in Figure 24. For
example, if you click on the drop down arrow beneath the date column, you
can select a range of dates. Only the transactions between the dates you
selected will be displayed.
If you make selections from the drop down
lists, the balances at the bottom of the register will include "Filter
Set" before the balance amounts. To clear the filter, select
"All" in the drop down lists for each column.
Section 4.2.2 - Adding, Editing and
Deleting Transactions
To add a transaction, click on <New>
in the last row of the register or click on the New button at the top of the
main window. A form will appear with several entry fields, see Figure 26.
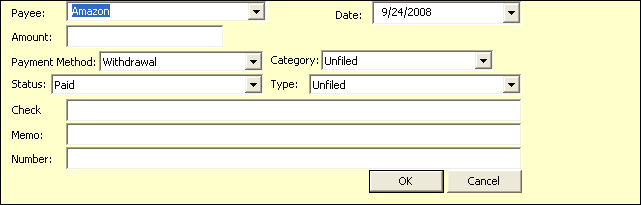
Figure 26
You can select a Payee from the drop-down
list or enter it manually. If you start typing and a similar entry exists in
the Payee database, Ascendo Money will automatically suggest Payees starting
with the same letters and automatically complete the field if you click on
the Enter key.
Payees in the database may have default
values set up for Category, Type, Payment Method and Status. When you finish
selecting a Payee, these fields will be automatically filled with the
default values to help speed data entry.
To edit an transaction, double click on the
row in the transaction register or highlight a row and click on the Edit
button at the top of the main menu. To delete a transaction, highlight a row
in the transaction register and click on the Edit button at the top of the
main menu.
Section 4.2.3 - Splitting Transactions
Each transaction
amount can be split across several categories. For example, you might
purchase food and a present for a customer in an airport store and split the
transaction across the Meals and Gifts categories. To split a
transaction, select "SPLIT" from the categories drop down list. In
the transaction split form, select categories and amounts and
then click on the Add button. Continuing adding categories and amounts until
the sum is equal to the transaction amount.
Section 4.2.4 -
Transferring Money between Accounts
Transfers can be used to move money from one account to another. For
example, you may want to move money from your checking account to your
savings account. Instead of having to create two transactions manually,
Ascendo Money allows you to create a transfer in one step.
To make a
transfer using the Ascendo Money Desktop, highlight the account you wish to
transfer from. Then click on Account in the top row menu and select Transfer
from the submenu. Enter the amount and select the destination account from
the list.
Ascendo Money
will create two transactions; a debit from the source account with Payee set
to "Transfer to Account Name", and a credit in the
destination account with the Payee set to "Transfer from Account
Name". Both transactions will be set to the amount you specified.
Section 4.3 - Managing Payees
Payees are people
or companies that receive payments from you, or that make payments to you. For
example, you may create a Payee named Vons Supermarket and record debit card
payments for groceries or a Payee with your employer’s company name to
record automatic salary deposits.
To manage payees,
click on the Payees button along the top of the main Window. A window will
appear containing a list of existing payees and a form to add or edit payees.
The first payee in the database will appear in the form with the fields
grayed out.
To add a payee,
click on the Add button at the bottom of the form, enter the fields and
click on the Save Button.
To delete a
payee, highlight a payee in the list and click on the Delete button at the
bottom of the window.
To edit a payee,
highlight it the list and click on the Edit button at the bottom of the
window. The
payee edit window, see Figure 27, contains several default fields and a memo
field. The values you select in the default field may be used to
auto-complete the transaction form when entering a new transaction.
.
Figure 27
4.4 Payment
Methods, Status, Categories & Types
Each transaction
includes information on the payment method, transaction status, category and
type of the transaction. You can use this information to sort transactions
and display reports on your spending habits.
You can add, edit
and delete Payment Methods. The default Payment Types are listed in
the table below. Each payment
method must be declared as a withdrawal or a deposit to that Ascendo Money
knows whether to add or subtract the amount from the account balance.
For example, if you enter a
payment to your cable company and select EFT (Bill Pay), the amount will be
recorded as a withdrawal and subtracted from your balance. If you enter a
transaction for your salary and select EFT (Direct Deposit), the amount will
be recorded as a deposit to your account and added to the account balance.
|
Type
|
Withdrawal or Deposit
|
|
Withdrawal
|
Withdrawal
|
|
Deposit
|
Deposit
|
|
ATM
|
Withdrawal
|
|
Check
|
Withdrawal
|
|
Credit Card
|
Withdrawal
|
|
Debit Card
|
Withdrawal
|
|
EFT (Bill Pay)
|
Withdrawal
|
|
EFT (Direct Deposit)
|
Deposit
|
|
Paypal (To)
|
Withdrawal
|
|
Paypal (From)
|
Deposit
|
|
Wire Transfer (Outgoing)
|
Withdrawal
|
|
Wire Transfer (Incoming)
|
Deposit
|
A transaction's
Status
indicates whether it has has been processed by your bank. For
example, you may write a check for a purchase but the check may clear the
bank a week later. Tracking the status of transactions can be useful to
verify if your account is about to go negative in order to avoid bank fees
or interest payments.
You can add, edit
and delete transaction status types. The default status types are listed in
the table below.
|
Status
|
Paid
or Unpaid
|
|
UnCleared
|
Unpaid
|
|
Cleared
|
Paid
|
|
Unpaid
|
Unpaid
|
|
Paid
|
Paid
|
|
Unreconciled
|
Unpaid
|
|
Reconciled
|
Paid
|
|
Imported
|
Unpaid
|
|
Downloaded
|
Unpaid
|
|
Undetermined
|
Unpaid
|
|
Void
|
Unpaid
|
Categories allow you to classify transactions in order to better understand you
spending habits. For example, you might want to create a category for Meals
to track how much you spend each month. To display the category management
screen, see Figure 28, click on the Category button along the top of the
main application window.
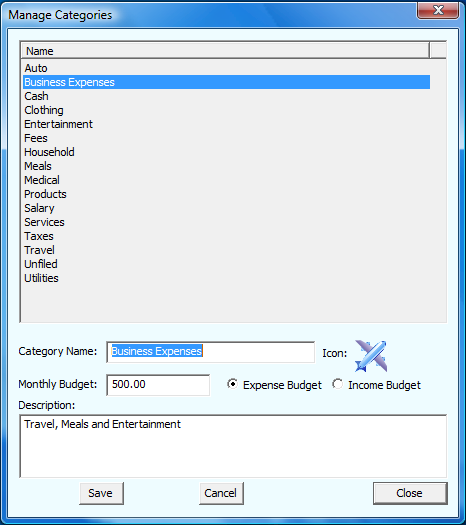
Figure 28
Categories are
used to track budgets so you must specify a budget amount for each category
and whether it is an expense budget or an income budget.
Types allow you
to further classify transactions. For example, some of the
transactions in the Meals category could be personal
while others could be business related.
You can add, edit
and delete categories and types. When you start Ascendo Money for the first
time, there are several predefined categories such as Automotive, Clothing,
Entertainment, etc. and types such as Business Expense, Personal Expense,
etc.
4.5 Managing
Budgets
Budgets allow you
to specify an amount that you would like to spend every month for transactions of a certain category. For example, you may budget $250 per
month on clothing. If you buy a shirt and jeans for $125, you will have
spend 50% of your budget.
To open the
Budget Management window, see Figure 29, click on the Budget button along
the top of the main application window. The Amount column displays the sum
of the transactions for a certain category for the current month. The
Percentage column indicates whether you are over or under budget. The
Remaining column tells you by how much.
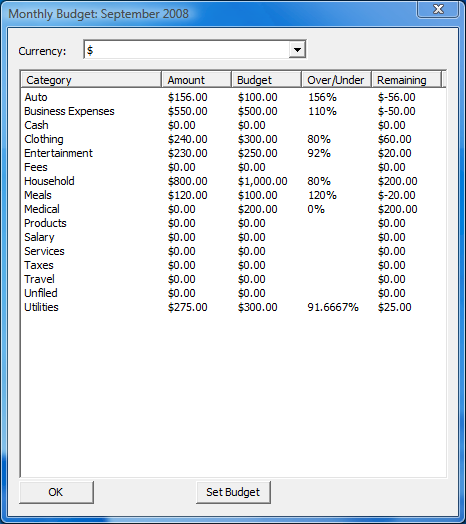
Figure 29
To set a
budget, click on a category row and then click on the Set Budget button at
the bottom of the window.
4.6
Reports
Ascendo
Money provides numerous reports to help you analyze your finances. To select a report,
click on the Reports button along the top of the main application window. A
new window with several report options will
appear, see Figure 30.

Figure 30
There
are several report types; Spending by Payee, Spending by Category,
Spending by Payment Method, Spending by Type and Deposits vs Withdrawals.
You can choose to display the data from one account or from all accounts.
The beginning and ending dates will determine the transactions that Ascendo Money
uses to create the report. You can choose to view the report as a Pie Chart, Bar
Chart or in List View.
4.7
Scheduling Recurring Transactions
Some transactions occur repeatedly, such as
salary deposits or mortgage payments. To avoid entering the same transaction
over and over, Ascendo Money enables you to schedule recurring transactions for
a payee based on the frequency that you specified.
To
schedule a recurring transaction, go to the main window and click on the
Schedule button. A list of scheduled transactions
will be displayed. Now select Add Recurring Rule from the screen menu to
display the recurring rule edit form, see Figure 31.
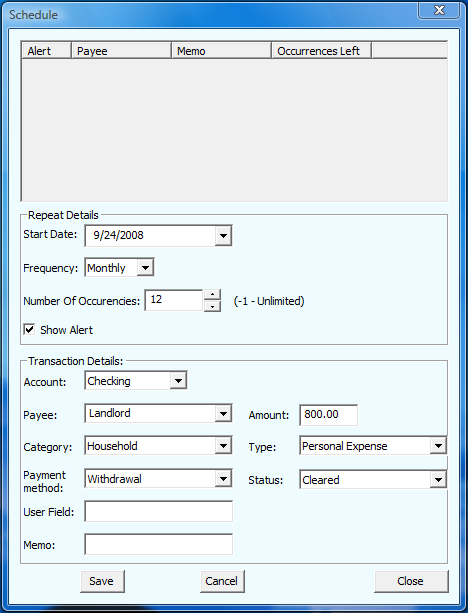
Figure 31
Scheduled
transactions will be created every time you start Ascendo Money based on the
date and the frequency you selected. For example, you could set up a
scheduled rent payment of $850.00 to occur every month. The Next Date is the
first date on which the transaction would occur. If you select next date to
be June 1st, then a Rent transaction would be created when you start Ascendo
Money on June 1st, July 1st, August 1st etc. You can specify a certain
number of occurrences or choose unlimited by setting occurrences to -1.
4.8
Customization
Options
Ascendo
Money for BlackBerry includes numerous user defined settings to to customize
fonts, colors, screen layouts and navigation. To
set these parameters, click on the Options button along the top of the main
application window.
Conflict
Resolution tells Ascendo Money what to do if you synchronize Ascendo Money
for BlackBerry with Ascendo Money Desktop and the same information has been
changed on both sides. If you select Desktop Wins, Ascendo Money will
overwrite the same information on your BlackBerry or vice versa. If you
select Manual, you will be prompted each time Ascendo Money finds a conflict
and asked to specify which version of the information to keep.
Fonts
and colors used in the Ascendo Money Desktop main window can be changed from
the Tools text menu along the top of the main application window.
4.9
Other Features
Ascendo Money Desktop contains many other features..
4.9.1
Reconciling Accounts
Reconciling bank statements with transaction
registers can be useful to determine if there are fraudulent charges or
expenditures that you forgot to make note of. Ascendo Money provides an account
reconciliation feature for this purpose. To reconcile an account, select
Reconcile from the View menu. Enter the beginning and
ending date of the period you want to reconcile. Ascendo Money calculates
beginning balance, ending balance, sum of reconciled transactions and the
difference, or un-reconciled amount.
4.9.2
Forecasting Account Balances
Ascendo Money allows you to forecast account balances at future dates. This can be helpful to adjust your spending
until the next payday. Ascendo Money will calculate your balance at any date
based on your current balance and scheduled transactions. To forecast a balance,
go to the transaction register screen and select Forecast from the screen
menu.
4.9.3
Online
Bank Download
If
you have a bank account that allows online access from a web browser, you
can use Ascendo Money to download transactions. To use this feature, select
Download from Bank from the Accounts menu. Select a bank from the list and
enter the same username and password that you would use to access the
account from a desktop web browser, then click Ok.
4.9.4
Importing
and Exporting Data
Ascendo
Money desktop allows you to import information in several formats;
- Open
Financial Exchange (OFX) format is a secure protocol for transmitting
financial data supported by numerous banks and software vendors such as
Intuit and Microsoft.
- Quicken
Interchange Format (QIF) was developed by Intuit to exchange financial
information. Some version of Intuit products released in 2003, 2004 and
2008 support QIF.
- Comma
Separated Values (CSV) is an industry standard method for exchanging
structured information in text format.
Ascendo
Money supports exporting in QIF and CSV formats.
|

