User Guide - Ascendo DataVault - Password Manager for Mac OS
Table of Contents
Overview

Ascendo DataVault is a secure password manager that allows you to store personal information such usernames, passwords, PINs, etc. using
the most powerful encryption technology.
You can store up to 10 fields and additional notes with each Item. For example, a health insurance item may include your subscriber number, group number, plan,
primary physician, etc. You can change the icon and field labels for each item.
Items can be organized into categories and types. Examples of categories could be "Personal" and "Business". Examples of types could
be "Credit Cards", "Logins" and "Memberships". Classifying items using categories and types provides an intuitive way to organize,
display and find your confidential information.
DataVault provides a set of templates that can be used to enter similar items more quickly by providing default field labels. For example, you may have several
logins that each have a username and password. Creating a login template allows you to create new logins without having to re-enter each field labels.
You can display Items in list view or tree view. List view displays each item in a separate row with columns for each field, similar to a spreadsheet. Tree view
displays items as branches in a tree where the first level is category, the second level is type and the third level is the item. The tree branches can be expanded
or collapsed individually or all at once.
You can find items quickly by typing characters into the search field at the top of the main window. The list or tree of items reduce to display only items containing
the search string.
DataVault includes numerous features to manage the security of your information such as field masking, password hint, security timeout and a customizable password
generator.
DataVault for Mac OS can be synchronized with DataVault for iPhone, iPod Touch & iPad and
DataVault for BlackBerry
(sold separately). The DataVault desktop allows you to import data and synchronize it with DataVault for iPhone, iPod Touch & iPad.
DataVault Installation
To install DataVault on a Mac, follow the instructions on the FAQ page to download
DataVaultSetup.pkg then double-click on the filename and follow the prompts.
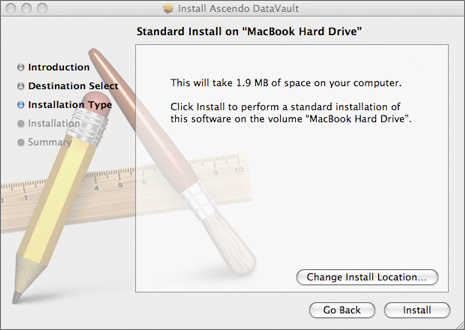
By default, DataVault will be installed in the Mac OS Applications folder. You can select a different folder by clicking on the "Change Install Location ..." button
when prompted, see image below.
During installation, an encrypted file called DataVault.db is created in the Documents folder. You can make a copy of this file to use as a
backup. If you erase this file and restart DataVault, a new file will be created with sample items.
Once you have completed Installation, you can start DataVault by opening the Applications folder and clicking on DataVault.
DataVault for Mac OS comes with a 30-day trial period during which time you can use the application for free.
Safari, Chrome & Firefox Plugin Installation
DataVault for Mac (version 4.4 and above) includes a plugin for Safari, Chrome and Firefox which allows you autofill web forms such as login screens, save web forms and access the
DataVault password generator from your browser.
The browser plugin for Safari and Firefox must be installed separately, after installing DataVault. First, download the latest version of the plugin from the DataVault for Mac
FAQ page. Then double-click on the downloaded file to initiate installation. To complete Firefox installation, an additional step is required, see FAQ for complete instructions.
To install the Chrome plugin, start Chrome on your Mac and click here.
For instructions on using browser plugins, skip ahead to the section on Safari, Chrome & Firefox Integration.
Registration
After purchasing DataVault from the Apple Mac store, you will be prompted to download and install DataVault. There are no additional registration steps
required.
If you download DataVault from the Ascendo web site or from a distributor, you will be prompted to Register when you start the application for the first time, or to
"Register Later". DataVault comes with a 30-day trial period during which you can try the product for free. To use this version of DataVault beyond the trial period,
you must enter a registratino key which will be sent by email when you complete the purchase process.
Please keep a copy of the order confirmation and registration key. The registration key will be necessary should you need to reinstall DataVault at a later time.
During the trial period, a registration window will appear each time you start DataVault. The number of days left in the trial period will appear in the text above
the registration field. To use DataVault without registering, click on the "Register Later" button. To register DataVault, enter the registration key and
click on the Register button.
Quick Start
When you start DataVault for the first time, you will be prompted to create a master password and an optional hint question. Choose a master password
and enter it twice to make sure you don't make a mistake, then click on the Ok button.
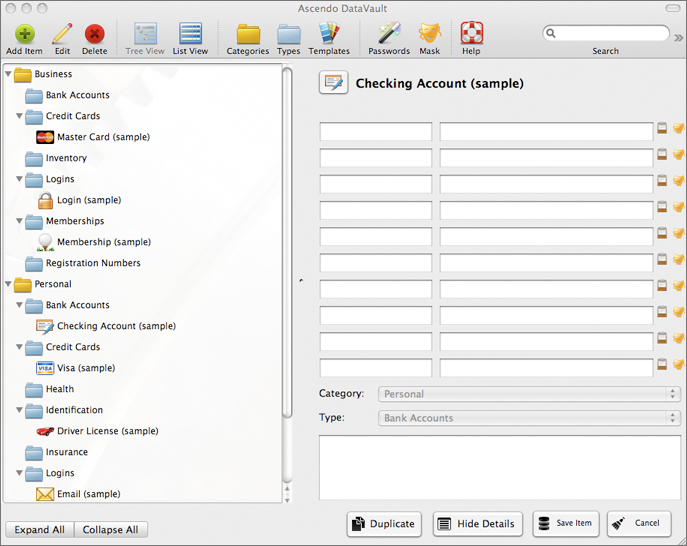
DataVault will display sample items, categories and types in a tree formation, see image below.
To create an item, click on the "Add Item" button in the toolbar along the top of the main window.
You can switch to edit item mode in several ways.
- Double-click on the item name in the tree or list view of left panel.
- Double-click on the item name of one of the field labels in the right panel.
- Highlight and item in tree or list, then click on Edit button in the toolbar.
To delete an item, highlight the item name in the list or tree and click on the Delete button in the toolbar.
To expand or collapse branches in the tree, click on the folder icons. To collapse or expand all levels in the tree, tap on the "Expand
All", "Collapse All" buttons below the tree.
To switch between viewing modes, click on the "Tree View" or "List View" buttons in the toolbar.
Master Password
DataVault protects your confidential information by requiring you to enter a master password each time
you start the application. The master password is used to encrypt and decrypt your data. When you first start DataVault, you will be prompted to select a master password, then enter it a second time to make sure you don't make a mistake.
A stength meter indicates whether the passwword you selected is Weak, Good or Strong. A password less than 8 characters is considered Weak. A password of 8 or more characters including numbers, upper & lower case letters is considered Good. A password greater than 12 characters containing numbers, upper & lower case charcters, and punctuation marks is considered Strong.
You can change your master password at any time by selecting "Change Password" from the File text menu.
Password Hint
A password hint is an optional security setting that you can use to obtain your master password if you forget it. The password hint consists of a
question and answer of your choosing. For example, you might enter "What was my fist telephone number?" as the question and then enter the correct answer to
be stored in DataVault. If you forget your master password, you can click on the "Password Hint" button in the login window. DataVault will display the hint
question and prompt you for the answer. If you enter the correct answer, your master password will appear.
To create a password hint, enter a question and answer when setting up your master password.
Adding an Item
To create an item, click on the "Add Item" button of the toolbar.
Editing an Item
To modify an item, double-click on the item name in tree or list view (left-hand panel). Alternatively, you can click on the item name to highlight it, then click on the
Edit button in the toolbar.
To change an item icon, click on the icon in the upper-left of the item details form. An icon matrix will appear. Click on an icon to select it and return to
the item details form.
To modify an item name, field labels, field contents or notes, click inside the field and start typing.
If you enter a string of characters into the field contents starting with "http://", DataVault will assume it is an internet address (URL). After saving the
item, the URL will be displayed as underlined text. This signifies that you can click on the link to open your browser and go to the web page.
To use a template, click on the arrows to the right of the template field and select from the drop-down list. Choosing a template will automatically fill the form
with a default icon, field labels, category and type. For more information, please see the section on Templates.
To choose a category or type, click on he arrows to the right of the field and select from the drop-down list. Selecting a category and type will determine the
position of the item in tree view.
When you are done editing, click on the "Save Item" button in the bottom-right of the screen to make the changes permanent or click on Cancel.
Deleting an Item
To delete an item, click on the item name in tree or list view then click on the Delete button in the toolbar.
Viewing Items in a Tree
To view items in a tree formation organized by category and type, click on the "Tree View" button in the toolbar. If the number of items exceeds the screen size,
a slider bar will appear to the right of the tree. Use the slider to move up and down the tree.
To expand or collapse a level in the tree, click on category or type folders. To expand or collapse all levels in the tree, click on the "Expand All"
or "Collapse All" buttons below the tree.
You can change the position of types and items using drag & drop. To move a type, click and hold a type folder, then drag it over a category and release it. To
move an item, click and hold an item name, then drag it over a type folder and release it.
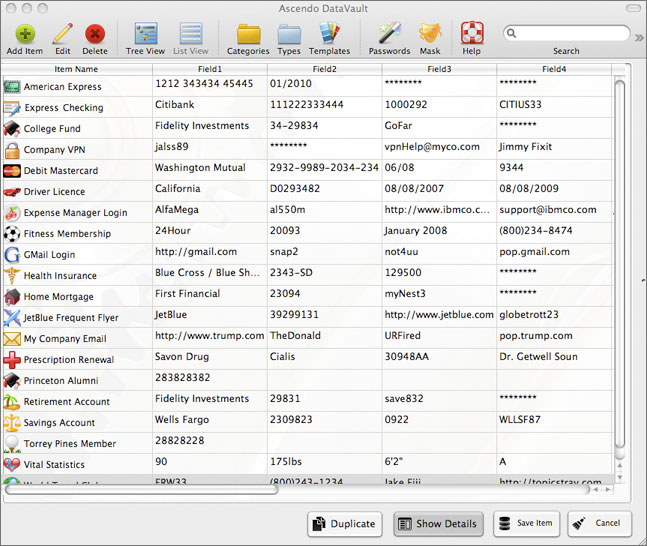
Viewing Items in a List
To view items in an alphabetical list, click on the "List View" button in the toolbar. If the number of items exceeds the screen size, a slider bar
will appear to the right of the list. Use the slider bar to move up and down the list. Use the horizontal slider bar at the bottom of the list to move across fields.
To hide the item details form and maximize the space available to display item fields, click on the "Hide Details" button in the lower right of the screen,
see image below. The button will change to "Show Details". Click on the button again to display the item details form.
Searching for Items
To find an item, click inside the Search field in the toolbar and begin typing. Each time you type a character, the tree or list of items will reduce
to include only items containing the search string. For example if you type "car", items such
as "Mastercard" and "Car Registration" will appear in the list. Clicking on the Escape key will clear
the search field and display all items.
Categories & Types
Items can be grouped into categories such as Business, Personal, etc. Each category can include several types such as Credit Cards, Logins and Memberships.
An Unfiled category and Unfiled type are created when DataVault starts for the first time. These folders cannot be deleted.
To add, edit or delete, click on the Category or Type buttons in the toolbar. If you delete a category or type, DataVault will ask you if you want to move
the items to the Unfiled folder or delete them permanently.
Templates
Templates allow you to set default icons and field labels for items that are similar. For example, all credit cards have a number, expiration date and
security code. Instead of entering the same field labels each time you create a credit card item, you can select the Credit Card template which will fill the
field labels automatically.
DataVault comes with a set of 25 pre-defined templates.
To add, edit or delete templates, click on the Template button in the toolbar.
Password Generator
The password generator can be used to suggest new passwords based on user-defined settings, see image below.
To invoke the password generator, click on the Passwords button in the toolbar.
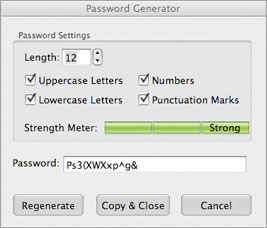
You can set the length of a password and choose the types of characters it contains. When you have finished choosing password settings, click on
the Regenerate button to display a new password.
A strength meter displays whether the password is "Weak", "Good" or "Strong". The longer the password and the
more types of characters you include, the stronger the password is.
When you have created a password that you want to use, click on the "Copy & Close" button to copy the password to the Mac OS clipboard. The
password generator window will close and you can click in Command-V to paste the password into an item form. Click on Cancel to close the password generator without
copying the password to the Mac OS clipboard.
Security Timeout
DataVault monitors your usage to determine if there are periods of inactivity that may indicate you stepped away from your computer. After an inactivity delay
of 5 minutes, DataVault will close the main window and display the master password login window.
Masking Field Values
Masking field values displays the characters as stars. You can toggle
between "stars" and the the actual field
contents by
clicking on the mask button to the right of the
field. This can be useful if
you are concerned that somebody see a password while
you are using DataVault. To mask a
field click on the mask icon to the
right of the field value in the item details form. Click once to mask
the field
and a second time to unmask the field. The
Mask button in the toolbar will
toggle all masked fields in list view and in the item
details form.
Backup
& Restore You
can create a secure copy of all the items, categories,
types and templates stored in DataVault using the
backup feature. You can restore the data from this
backup in case your computer is stolen, your hard
drive crashes or you change computers. To
backup your data, click on the File option
in the DataVault text menu, then select Backup. Your
data will be encrypted using your master password. To restore the data, select File >
Restore and enter the master password used to backup
the data.
Automatic Backups
DataVault for Mac (version 4.4+) provides settings to manage automatic backups. To access these settings, click on the DataVault > Preferences
from the menu bar.
To initiate automatic backups, check of the box marked "Allow Automatic Backups". A backup will be made each time you quit DataVault after having modified information. Each
backup will include a timestamp in the file name so you can go back to older backups in case you overwrite important information. You can also chose the folder in which
you want to store your automatic backups.
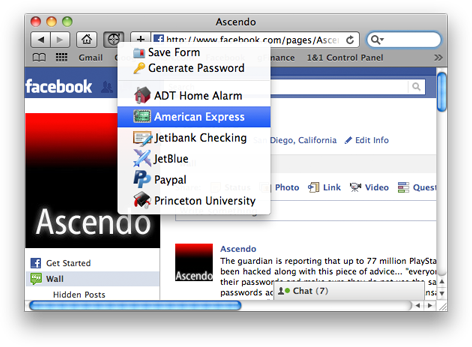
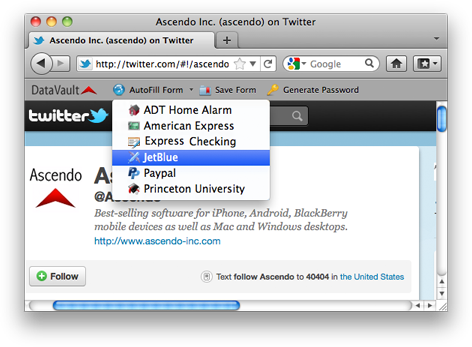
Safari, Chrome & Firefox Integration
DataVault for Mac (version 4.4+) includes plugins for Safari, Chrome and Firefox that allow a user to autofill web forms, save web forms to DataVault and access the DataVault password generator from
within the browser. The plugin must be installed separately from DataVault, see section on Safari, Chrome & Firefox Plugin Installation.
The DataVault plugin for Safari can be accessed by clicking on the vault icon to the right of the home icon, see screen shot below.
 The DataVault plugin for Firefox is accessible from the DataVault Toolbar below the Firefox address bar, see screen shot below.
The DataVault plugin for Chrome is accessible from the DataVault icon to the left of the Chrome tools icon.
Autofill Web Forms
DataVault for Mac (version 4.4+) includes an add-on for Firefox which allows you autofill web forms, save forms and use the DataVault password
generator from within Firefox.
After installing the DataVault Firefox Addon, a DataVault menu bar will appear at the top of the Firefox screen. To autofill a web form you must first create and item
in DataVault using the Add Form button in Addon menu bar following these steps.
- Go to the URL with the form you want to autofill.
- Enter the fields you want to save but do not submit the form.
- Click on the Save Forms button in the DataVault Addon. You may be prompted to enter the DataVault master password if DataVault for Mac is not already running.
- Verify the item in DataVault and save.
The next time you want to login to the form, simply click on the Web Items drop down list then select the the item of the form you want to fill. You can type a letter
to skip to the first item starting with the letter, then click again to cycle through items beginning with the letter you typed.
Importing & Exporting
DataVault for Mac OS allows you to
import and export items in DataVault Exchange format
(DVX). To export data from DataVault, click on Tools > Export...
in the DataVault text menu. To
import a DVX file into DataVault for Mac OS, select
File > Import DVX from the text menu. DVX files
do not contain category and type information for items.
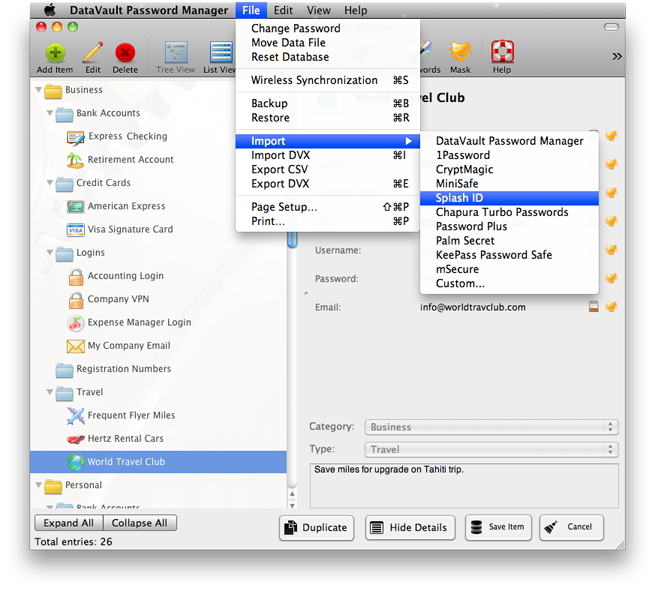
Importing from 3rd Party Applications
DataVault for Mac allows you to import data directly from the following 3rd party applications: SplashID, mSecure, 1Password, Keepass, Passwords Plus, Turbo Passwords,
Cryptmagic and Minisafe.
To import data, you will first need to export it from the 3rd party application. Exporting is different for each application but in general you should select a
text delimited format such as comma separated values (CSV). Then select File > Import from the DataVault for Mac menu bar and choose the application you
want to import from (see image below). Browse to the file location and select the file.
More detailed instructions for importing data into DataVault can be found for SplashID,
mSecure, and
1Password.
Synchronizing
DataVault for Mac can be synchronized with DataVault for iPhone, iPad & iPod Touch and DataVault for BlackBerry. DataVault provides two-way synchronization
allowing you to add, edit or delete items on your desktop and handheld device. In addition, DataVault provides conflict resolution so that if you modify
an item on your handheld and desktop you can decide which version to save
Synchronizing between two versions of DataVault requires that you use the same password. Several synchronization methods are available depending on your computing
environment. Some may require user configuration to function properly. Troubleshooting tips can be found in the Frequently Asked Questions pages (FAQs)
located on the Support Page.
Synchronizing with iPhone, iPad or iPod Touch
To synchronize over a Wi-Fi connection, start DataVault for Mac and select File > Synchronize from the menu bar. Do not close the synchronization window
until synchronization has completed. Then start DataVault on your iPhone, iPad or iPod Touch, tap on the tools icon and select Synchronize from the menu. A "Sync Services" screen will
appear displaying a list of devices detected on your network.
Select the Mac desktop on which DataVault is running. If you use DataVault for Mac version 4.3.3 or above, it will appear as "DataVault (Mac Name)". If you are
not sure of the name of your Mac, you can find it in System Preferences > Sharing. Then verify your Mac's IP address in System Preferences > Network and tap on the Synchronize button.
Alternatively, you can enter the IP address before selecting a device on your Wi-Fi network by selecting "Manually". Entering an IP address manually will allow DataVault for iPhone, iPad
or iPod Touch to connect to DataVault for Mac over a fixed line (Ethernet) cable but requires your Mac to have a fixed IP address.
Devices running iOS version 3.2 or above can use application file sharing to synchronize by following the steps below.
- Start DataVault on your iOS device and tap on the tools icon, then select Synchronize > File Sharing (iTunes).
- Connect your iOS device to your desktop with a data cable and start iTunes.
- Select your iOS device on the left of iTunes, then click on the Apps tab along the top.
- Move to the bottom of iTunes and click on DataVault in the File Sharing section.
- Highlight DataVaultSyncDataFromDeviceSDCard.dvx under DataVault Documents then click on Save to...
- Return to your desktop and double-click on DataVaultSyncDataFromDeviceSDCard.dvx. Alternatively, you can start DataVault for Mac, click on File > "Import
from DVX" and select the file.
- An alert will appear asking "Would you like to initiate 2-way synchronization...". Click on Synchronize.
- If you have chosen to resolve conflicts manually, you will be prompted to choose which versions of items you want to save.
- Return to iTunes and click on the Add button from the File Sharing section.
- Select DataVaultSyncDataFromDesktop.dvx from your desktop file system, then sync iTunes to complete the DataVault synchronization process.
Synchronizing with BlackBerry
To synchronize over a Wi-Fi connection, start DataVault
for Mac and select File > Synchronize from the menu bar. Then start
DataVault for BlackBerry and select Advanced from
the main menu. Click on Connection Settings and
select Wi-Fi. Now enter the IP Address and click on
Connect.
To synchronize over email, start
DataVault for BlackBerry and select Advanced from
the main menu. Select "Sync over Email"
then enter your email address and click on Send.
When you receive the email, save the attachment to a
folder on your hard drive.
Start DataVault for Mac,
select File > Import from DVX and select the file
you sent by email. When the first step in the
synchronization has been completed, you will be
prompted to send desktop modification back to your
BlackBerry by email.
Open the email on your Mac and
double-click on the attached DVX file. Enter your
DataVault master password when prompted. Resolve any
conflicts in the data by selecting the versions that
you want to keep
|